OpenJDK Developers’ Guide
- Introduction
- Contributing to an OpenJDK Project
- Mailing Lists
- Code Conventions
- JBS - JDK Bug System
- Cloning the JDK
- Making a Change
- Building the JDK
- Testing the JDK
- Working With Pull Requests
- Reviewing and Sponsoring a Change
- Backporting
- Release Notes
- The JDK Release Process
- Project Maintenance
- HotSpot Development
- Code Owners
- About This Guide
Introduction
Welcome to the OpenJDK Developers’ Guide!
The OpenJDK Community is the place to collaborate on open-source implementations of the Java Platform, Standard Edition, and related Projects. It was created in November 2006, when initial portions of the JDK source code were published under the GPLv2 license.
In order to work together efficiently, clear directions are sometimes needed to avoid misconceptions and to align developers’ views of terminology and process. The OpenJDK Community is a fairly pragmatic place. “Do the right thing” is most often the right course of action. Still, if people do things in the same right way then everyone’s work becomes more transparent and easier for others to follow. For this reason most parts of the development process have standard flows that are the recommended ways to do things.
The goal of this guide is to answer questions that developers of the JDK might have around development process, tooling, standards, and so forth. The formal rules and processes are described in other documents, such as JEP 1 for the JDK Enhancement-Proposal & Roadmap Process, and JEP 3 for the JDK Release Process. This guide is meant to be a complement to such documents, with tutorials and examples for how to follow these rules and how to work together with the rest of the OpenJDK Community.
There are many common use cases that aren’t detailed in the formal process. This guide suggests how to work in such cases.
OpenJDK
Quick Links
OpenJDK consists of a number of Groups. Members of a Group collaborate on an area of mutual interest. The right hand side bar on the OpenJDK website has a list of all Groups in OpenJDK. If you’re interested in a specific area, this is where you would start your OpenJDK experience. Look at the Group’s information and wiki pages, and see what Projects they sponsor on the Census page. The Census shows the structure of the OpenJDK Community.
Projects are where the coding and much of the other work is done in OpenJDK. There are many different Projects, some produce shippable artifacts, like the JDK Project, some produce tools to be used by developers of these artifacts, like the Code Tools Project or Project Skara, and some produce documentation, like the Developers’ Guide Project. Many Projects designs and develops new features for the Java language or the JVM, but there are also less code centric ones like the Duke Project which collects images of the Java mascot, Duke.
Author, Committer, Reviewer
OpenJDK has a few different roles that determine who has the right to do what in the different Projects. These roles are defined in the OpenJDK Bylaws. The roles are earned based on experience and knowledge within each Project.
A Contributor can have different roles in different Projects. When you’re new to a Project you don’t yet have a formal role in that specific Project, even though you might have earned roles in other OpenJDK Projects or have been recognized as a Contributor or a Member of OpenJDK. By contributing high-quality content you’ll soon be eligible for OpenJDK roles in the Project. First Author, then Committer, and finally Reviewer if you stay active and earn the trust of the community. Trust is an important part of earning these roles. There’s a rough guideline saying that to become a Committer you should have contributed 8 significant changes, and to become a Reviewer you should have contributed 32 significant changes. In reality it’s not as easy as “just” contributing code. You need to build a track record of good decisions and sound judgment and show that you know what differentiates a good change from a not so good one. It’s not only correctness of the code that matters, it’s also the appropriateness. In the end the trust you’ve earned is put to the test through a vote.
Note that when a new Project is created an initial set of members can be brought in at different levels without a vote.
Becoming an Author
Becoming an Author is the first step. To achieve this you need to contribute two changes to the Project in which you wish to become an Author. Once your changes are integrated into the code base and has been vetted enough to determine that the changes were indeed good changes you can go ahead and send an email to the Project lead of that particular Project and ask to be added as an Author. Note that “the Project” is not OpenJDK, but rather the specific development Project where you did your contributions (e.g. “JDK”, “JDK Updates”, “Amber”, etc). The OpenJDK Project description has a template for such an email. In short the email should contain your name, the Project name, your email address, and GitHub links to your changes. In response to your email you will get a time-limited invite which you should fill out.
To see who the Project lead is for your Project, see the OpenJDK Census. The Census unfortunately doesn’t provide email addresses for people, but assuming you have been active on the Project mailing list (since you are applying for Author after all), you should be able to find the lead’s email address in your local email archive, or ask your Sponsor.
As an Author you will get your OpenJDK user name. Once you have gotten the user name, this should be associated with your GitHub account in order for the bots to be able to identify you on GitHub. See the Skara documentation for more details on that. Once that’s done you can create PRs and get them reviewed, but you’ll still need a Sponsor to integrate changes. You’ll also get write access to JBS and the OpenJDK wiki related to the Project in question, and to cr.openjdk.org via an SSH key provided at the time you accept your invitation.
The rules of any particular Project may have different guidelines regarding requirements for Authorship at the discretion of the Lead.
Becoming a Committer
To become a Committer you should show that you intend to actively contribute to the Project and that you can produce non-trivial changes that are accepted for inclusion into the Project code base. The number eight has been seen as a formal lower limit on the number of changes, but since the changes must be non-trivial, or “significant” as the OpenJDK Project description says, and the definition of significant is subjective, the general recommendation is to wait with a Committer nomination until there’s at least 10-12 changes integrated to have some margin for different interpretations of “significant”. In practice though, we have seen several examples where the number of significant changes hasn’t been the dominating factor in a Committer vote. A Contributor’s work in another OpenJDK Project may also be relevant for the vote. What the vote should ultimately test is the Contributor’s commitment to the OpenJDK Project for which the vote applies - is it believed that the person is dedicated and willing to spend time and effort on the Project? Is the person believed to be a good citizen of the Project? It’s always a good idea to seek the advice of a Sponsor who can guide you through the process to becoming a Committer - you will need one to run the Committer vote anyway. They will probably also have a better idea of what constitutes a “significant” change.
Once you have the required changes, a Committer in the Project can start a vote by sending an email proposing that you should become a Committer. The email should follow the template found in the OpenJDK Project description.
A Committer is allowed to integrate changes without the aid of a Sponsor. A Committer is also allowed to nominate other non-Committers to become Committers in the Project.
Becoming a Reviewer
To become a Reviewer you must show a track record of sound and correct judgment calls as mentioned above. Being a good Committer doesn’t necessarily make you a good Reviewer. As a Reviewer you have the power to approve changes for inclusion into the Project source code. This means that a Reviewer needs to be able to judge the quality and appropriateness of any proposed change, not just the mechanics of the code.
The assumption is that after having produced 32 significant changes one should have become familiar with the process around reviews and the requirements around getting a change approved. This should really be seen as a minimum requirement though. A more practical consideration would be to look at whether the non-trivial commits of a potential Reviewer are accepted largely intact or whether they are always being refined by the review process. There may be cases where it will take significantly more than 32 changes for a Committer to be ready to become a Reviewer.
Once you are deemed ready, a Reviewer in the Project can start a vote by sending an email proposing that you should become a Reviewer. The email should follow the template found in the OpenJDK Project description.
Non-trivial/Significant changes
One key definition when advancing through the OpenJDK roles is the significant change. What exactly does it take for a change to be significant?
Instead of describing the significant change (because that’s quite difficult to define) provided here is a few examples of changes that wouldn’t be considered significant or for other reasons wouldn’t count as significant contributions.
- Purely aesthetic changes like renaming or fixing indentation
- Repeated follow-up bugfixes from earlier changes
- Larger changes where only a non-significant portion of the work was done by the Contributor under vote
- Trivial backports of someone else’s changes
Contributing to an OpenJDK Project
Contributing to OpenJDK can take many forms. Writing code and providing patches is just one of them. A big part of developing a feature or a bugfix is testing and code review. Anything you can do to help out in these areas will be recognized as a contribution. Join the mailing lists to engage in design discussions and reviews, and download the latest EA builds or Project repositories to try out new features and give feedback. If you see some misbehavior, or if you see somebody mention some misbehavior on some internet forum, try to track it down. Good bug reports with reproducible test cases are extremely valuable and make excellent contributions.
Anything you can do to spread the word about Java, new features, and your experiences using the JDK will be helpful for the community and to the OpenJDK developers. Trying out a new feature and reporting your experiences is also a contribution. Whether you find that the new feature improves your application, or if you find some area that needs to be improved, your feedback is valuable to the developers of that feature.
If you have a success story where Java solved your problem, or if you successfully upgraded to a more recent version of the JDK and noticed some improvements, spreading this story through a blog, news article, or some other channel is also a contribution.
If you’re in a position to choose what programming language to use in a project, in a tutorial, or in a class, you have the power to enlarge the Java community in a very direct way, and your colleagues or students will get an opportunity to learn one of the most used programming languages in the world.
Things to consider before proposing changes to OpenJDK code
Every change to JDK code carries a risk of changes in behavior which may adversely affect applications. Generally we’re looking to improve the functionality and capability and sometimes performance of the platform without that negative consequence. So we need to ask ourselves whether each change is worthwhile - and some may not be no matter how well intentioned.
One question to ask yourself is: What problem are you trying to solve?
The important thing here is to understand the problem itself, independent of any solution (and independently of the solution that currently happens to be in your change). A number of other questions and lines of thought emanate from thinking about the problem. For example: is this the right problem to solve? Does solving this problem create worse problems elsewhere; that is, is there a net benefit? Does this problem need to be solved in the JDK, or can and should it be solved elsewhere (e.g., in tooling)?
The next question you need to answer before making any change is: What is the main intention of your change?
Depending on your answer to that question you will need to consider one or more of the following paragraphs.
-
Correctness – If your change improves program correctness, that’s important. And to broaden this, fixing of all kinds of bugs that really make things better for applications in ways they can detect is important.
-
Robustness – Updating code to use a newer platform API can be a good change. Moving away from APIs that are being deprecated or that are no longer maintained is likely desired. Do note though that supposedly equivalent APIs may not be the drop in replacement you think they are. You’ll need to prove that the code has the same behavior after the change through extensive testing.
-
Security – If you intend to increase the overall security of the platform, changes following secure coding practices and using appropriate platform APIs for that are usually welcome. The exception might be if it’s a potentially destabilizing change in code where there’s only a theoretical problem. Please note: If you think you found a real security bug that might compromise the platform you should follow the process here.
-
Refactoring / Cleanup – Making code easier to understand or reducing code size may be a good change in areas that are under active development. Stable code however isn’t a good candidate for refactoring regardless of what the code looks like. The OpenJDK has evolved over many years and some parts have been stable for decades. If there’s no immediate need to work on the code for other reasons, then what will a cleanup actually achieve? One specific area where refactoring and cleanups are explicitly discouraged is in third-party code.
-
Performance – Can you demonstrate a user perceptible change? If you can’t measure the change, or a user can’t notice the change, or the change only improves code that is used infrequently, then maybe it isn’t worth it. Do you have benchmarks to back up your claims? Do you understand the results? Performance testing is complex and often there are many factors unrelated to your change that affects the numbers. What’s the tradeoff? The performance improvements that just make everything better do exist, but they are extremely rare. Most often the code gets more complex, or you speed up one case but slow down another. Are you making the right tradeoff?
-
Modernizing – Changing code purely for the sake of using a new language feature isn’t usually a good change. Be a subject matter expert, not just a language expert. Writing code in “a better way” is not guaranteed to be safe. A change of behavior is always possible and unless you understand the code you are changing at more than the core language/API level, and have looked into appropriate tests and can speak to the risks, then you should first find a subject matter expert to discuss it with. Keep in mind that the OpenJDK code is developed by a large community. If a new language feature is introduced, all developers working in that code must learn this new feature and understand the implications of using it.
I have a patch, what do I do?
Quick Links
In many GitHub projects the standard way to propose a change is to create a pull request (PR) and discuss the patch in the PR. For OpenJDK Projects the situation is somewhat different. The JDK is used for mission critical applications and by millions of developers, the bar to contributing changes is high. Please follow the steps outlined below to make sure your change passes above the bar before creating a PR.
1. Sign the OCA
Like many other open-source communities, the OpenJDK Community requires Contributors to jointly assign their copyright on contributed code. Oracle is the steward of OpenJDK and if you haven’t yet signed the Oracle Contributor Agreement (OCA), and are not covered by a company-level agreement, then please do so. This is required in order to make your patch available for review. The OCA gives Oracle and you as a Contributor joint copyright interests in the code. You will retain your copyright while also granting those rights to Oracle. If you don’t know if your organization has signed the OCA you can check the OCA Signatories List, or ask your legal advisor.
When you sign the OCA, please make sure that you specify your
GitHub user name in the Username field of the OCA. If
you try to create a PR before you have signed the OCA, or if you
didn’t specify your GitHub user name, you’ll get
instructions telling you to do so, and the PR won’t be
published until this is done. OCA registration is a manual process.
Please allow for up to several days to have your OCA application
processed, even though it’s normally processed swiftly. An
alphabetical list of all of the assigned OpenJDK usernames can be
found on the OpenJDK
people list.
You only need to sign the OCA once in order to cover all changes that you might contribute to any Oracle-sponsored open-source community. If you’ve already signed the OCA or the former SCA (Sun Contributor Agreement) for any Oracle-sponsored open-source community, then you do not need to sign it again in order to contribute to OpenJDK. Please note that you don’t need to sign an OCA if you work at Oracle or a company which has negotiated an equivalent agreement.
2. Socialize your change
Once the OCA is signed, please restrain your urge to create a PR just a little while longer. In order to prepare the community for your patch, please socialize your idea on the relevant mailing lists. Almost all changes, and in particular any API changes, must go this route and have a broad agreement in place before there is any point in presenting code. To understand the criteria by which your patch is going to be judged, please read Why is My Change Rejected? below. In short, hidden constraints and assumptions, stability and quality, maintainability, compatibility, and conformance to specifications must be considered before your PR is ready to be submitted. If you don’t understand the constraints for acceptance, you might be surprised when your PR is rejected.
Please note that lack of engagement should not be interpreted as supporting the proposal. Lack of engagement might be better interpreted as people are busy or maybe that the problem isn’t compelling or high priority enough to spend time on right now. If you didn’t get the desired attention and the required agreement in your mail thread, do not proceed to create a PR.
3. Find a Sponsor
Socializing your change on the mailing lists also prevents the surprise that would otherwise make the community choke on their morning coffee when they see a huge patch in a new, unknown PR. As a new developer in the community you’ll need to make a few friends that agree with your change. There are many good reasons to make friends, but the one relevant here is that for your first changes you’ll need a Sponsor to facilitate the integration of your work. The Sponsor will perform any number of administrative tasks like JBS updates, additional testing, etc. It’s usual for a Sponsor to also be a reviewer of a change and thus familiar with it, but it’s not a requirement.
4. Create a tracking issue in JBS
Many OpenJDK Projects require a tracking issue to be filed in the JDK Bug System (JBS) before a change can be integrated. This is the case for instance for the JDK and the JDK Updates Projects. In order to obtain write access to JBS you need to be an Author in an OpenJDK Project (see Becoming an Author). For your first changes, ask your Sponsor to help you create the issue or file the bug through the Bug Report Tool.
5. Get acquainted with local process
Even though we strive to unify how things are done within OpenJDK, different areas and Projects in OpenJDK may have slight variations in how they work. Some of these differences are highlighted throughout this guide, some aren’t. If you’re new to an area, make sure you understand local differences before you proceed. Ask your Sponsor who should be your main point of contact through your first developer experience in OpenJDK.
Why is my change rejected?
Just about every Java developer out there has an idea or two for how to enhance something. And believe it or not, not every idea is a good idea. Even though many ideas are indeed good, we must be quite restrictive on what we actually include into the JDK. The goal is not to take in the maximum number of contributions possible, but rather to accept only the highest-quality contributions. The JDK is used daily by millions of people and thousands of businesses, often in mission-critical applications, and so every change must be scrutinized in detail. There are many reasons for this.
-
Hidden constraints and assumptions – Many sections of code have constraints and assumptions that aren’t necessarily visible at first glance. This might preclude certain changes, even those that might seem obvious.
-
Stability and quality – The JDK is used by millions of developers and as a widely deployed commercial product, it’s held to a high standard of quality. Changes should include tests where practical, and core tests should pass at all times. The value of the change should outweigh the risk of introducing a bug or performance regression.
-
Maintainability – Any new feature or code change will need to be maintained in the JDK essentially forever, thus imposing a maintenance burden on future maintainers. The code might still be in use long after you and the people who reviewed it have moved on. New maintainers must be able to understand how to fix bugs in this code.
-
Complexity – Each new feature interacts with all the existing features, which can result in geometric growth of the interactions among features if features are added unchecked. Sometimes we avoid adding a new feature, even if it seems like an obvious thing to add, if that feature would make it difficult to add a more important feature in the future.
-
Adherence to specifications – Much of the JDK is governed by a series of specifications, in particular the Java Language Specification, the Java Virtual Machine Specification, and the Java API Specification (“javadocs”). All changes must be checked and tested carefully to ensure that they don’t violate these specifications.
-
Javadoc comments are specifications – The Java API Specification is authored in the form of javadoc comments, so even apparently innocuous changes to comments can be quite significant. It’s not always easy to tell what comments are part of the specification and what parts are merely code comments. Briefly, documentation comments on public packages, classes, and class members of exported modules are specifications.
-
Specification changes – It’s possible to change the API specifications, and this is done regularly. However, these changes require even more scrutiny than code changes. This extra review is handled by the CSR Process. Specifications are written in stylized, somewhat formal language, and they don’t simply describe what the code does. Writing specifications is a separate skill from coding.
-
Compatibility – Changes should also adhere to high standards of binary, source, and behavioral compatibility. The compatibility impact of apparently innocuous changes is sometimes startling.
For reasons like these it’s quite possible that your change, even though it adds value to you, isn’t deemed to add enough value to the larger community.
If you’re relatively new to the Java platform then we recommend that you gain more experience writing Java applications before you attempt to work on the JDK itself. The purpose of the sponsored-contribution process is to bring developers who already have the skills required to work on the JDK into the existing development community. The members of this community have neither the time nor the patience required to teach basic Java programming skills or platform implementation techniques.
The feature releases currently under development are in the JDK Project. Most development work is focused on the newest release, so generally you should be working against the latest JDK sources rather than the JDK Updates sources.
Mailing Lists
Quick Links
The mailing lists are the key communications mechanism for all
OpenJDK work. All participation in an OpenJDK Project starts
with joining the relevant mailing list. A subscriber to an OpenJDK
mailing list is referred to as a Participant in the
Bylaws. As a general
recommendation we suggest to subscribe to announce,
discuss,
and the -dev lists covering your explicit area of
interest. All OpenJDK mailing lists are found here:
Please note that OpenJDK mailing lists typically are for discussions about the development of the JDK, not its usage. This is not a place to ask support questions. If you think you found an issue in or with the JDK, see JBS - JDK Bug System for instructions on reporting it.
The OpenJDK Community is a friendly place. To keep it that way it’s important to keep a professional tone in emails and be aware that the community is global. Many different people with different backgrounds collaborate in these lists. Even though English is the required language for all lists, many Participants speak other languages as their native language. A high tolerance for non-perfect English is expected from anyone joining these lists. You’re also strongly encouraged to use your real name on the mailing lists. This adds to the professional tone of your email. Postings from anonymized mailboxes risk being seen as spam. If you do work in OpenJDK on behalf of your employer, please also list this affiliation. If your GitHub username differs from your real name it’s also a good idea to include that to identify yourself and your actions on GitHub.
You must be a member of a list to be able to post to that list. Some lists are moderated to keep the content on topic. Each list has its own archive where you can browse older conversations on the list.
There are a few different types of lists. The list name has two
parts to explain what the list is intended for,
<name>-<suffix>. The name often refers to
the Project that
owns the list or a specific area of interest that the list focuses
on. The suffix is explained below. Not all Projects or areas have all
types of lists described here.
-dev- Technical discussions around the implementation of the Project artifacts. This is also where code reviews happen.
-use- Technical discussions around the usage of the Project artifacts.
-discuss- General discussions around the Project. The special case
discuss@openjdk.orgis used for general discussions around OpenJDK. Discussions around new Project proposals usually happen here.
-changes- Changeset notifications from the source code repositories maintained by the Project.
-announce- General Project announcements. These lists are tightly moderated and are expected to be low traffic. The special case
announce@openjdk.orgis used for announcements for OpenJDK.
-experts- Expert group discussions. The list is restricted; only members of the expert group can subscribe.
-observers- Open for anyone to subscribe to see what the experts are discussing and potentially to have some dialog with other non-experts. There is no guarantee that an expert is subscribed to the
-observerslist or will see any responses on that list.
-comments- Used by observers to directly provide feedback/comments to the experts (typically a lead will process the comments list and forward things on to the experts list).
Changing your email address
If you need to change your registered email address, or if you have any other problems with the mailing lists, please contact mailman@openjdk.org.
Code Conventions
Quick Links
JBS - JDK Bug System
Quick Links
JBS is a public issue tracker used by many OpenJDK Projects and is open for anyone to read and search. To get write access you need to be registered in the OpenJDK Census by becoming, for instance, an Author in an OpenJDK Project.
Filing an issue
When a new failure is found, or an improvement identified, an issue should be filed to describe and track its resolution. Depending on your role in OpenJDK you can either use the Bug Report Tool or, if you are registered in the OpenJDK Census, you can report the issue directly in JBS.
When filing an issue, try to make the report as complete as possible in order to make it easier to triage, investigate and resolve the issue. Bug descriptions and comments should be written in a professional manner.
If you suspect that the issue is a vulnerability, don’t file a JBS issue! Instead send your report to vuln-report@openjdk.org. Also use this alias if you find an existing report which may cover a vulnerability - please do not report or discuss potential vulnerabilities on any open lists or other public channels - see OpenJDK Vulnerabilities for more information.
A few things to keep in mind when filing an issue:
- Before filing, verify that there isn’t an open issue
already filed.
- Search JBS for things like the name of the failing test, assert messages, the name of the source code file where a crash occurred etc.
- If you find a similar issue that was closed as Cannot Reproduce then it may be appropriate to re-open that one - if you don’t have direct access to JBS you can file a bug using the Bug Report Tool requesting that it be reopened.
- Make a reasonable attempt to narrow down which build or release the failure first appeared in.
- Set Affects Version/s to the
earliest JDK version where the failure was seen.
- If the failure is found in an update train of the JDK (e.g. 11.0.x), please see (if possible) if it’s also present in mainline. See Indicating what releases an issue is applicable to for more details.
- All issues of type Bug must have the Affects Version/s set. It’s not a bug if it doesn’t affect some version.
- For enhancements the Affects Version/s should be left empty, unless it is only relevant to a specific release family.
- Add relevant Labels like
intermittent, regression,
noreg-self, tier1 etc.
- For more information see the JBS Label Dictionary.
- Set the priority.
- It’s not the reporter’s responsibility to set a correct priority, this will be done later in triage, but a qualified guess is always better than the default. In JBS the range of priorities go from P1 (High/Important) to P5 (Very Low/Not Important), with the default being P4.
- If you have a sense that the issue is critical, or not critical at all, then adjusting the priority higher or lower makes sense, otherwise you can leave it as the default.
- When setting the priority, consider things like how the bug impacts the product and our testing, how likely is it that the bug is triggered, how difficult is it to work around, and whether it’s a regression, since that may break existing applications. Regressions are often higher priority than long-standing bugs and may block a release if not fixed. An example of a P1 would be an issue that is blocking a build or a release, whereas a P5 would be a minor typo in a code comment.
- In the Description, always
include (if possible):
- error messages
- assert messages
- stack trace
- command line information
- relevant information from the logs
- full name of any failing tests
- Avoid including in the report:
- personal information
- passwords, logins, machine names
- logs which may include sensitive data
- large amount of text or data - large logfiles are better provided as attachments
- If the failure isn’t reproducible with an existing OpenJDK test, attach a reproducer if possible, having a test case will decrease the time required to resolve the issue.
- In general the CPU and/or OS fields should not be set. ONLY use them if you know that the issue is only relevant to a particular platform or set of platforms.
- Provide the output of
java -versionwhenever possible - this version information is particularly critical for hangs, JVM bugs, and network issues. - Always file separate bugs for different issues.
- If two crashes look related, but not similar enough to be sure they are the same, it’s easier to later close a bug as a duplicate than it is to separate out one bug into two.
Types of issues
The most common issue types are:
| Issue Type | Covers |
|---|---|
| Bug | A Bug should relate to functional correctness - a deviation from behavior that can be tied back to a specification. Anything else, including performance concerns, is generally not a bug, but an enhancement. Though it’s not clear-cut as a significant performance regression may be classified as a Bug, for example. |
| Enhancement | An Enhancement is a small to medium improvement to existing functionality. |
| JEP | The JEP issue type is used for a proposal of a significant change or new feature which will take four or more weeks of work - see JEP-1. |
| Sub-task | Sub-tasks can be used to break up the work for an issue, such as the changes to the docs, tests etc. This is not recommended as a way to break up a large amount of code change associated with a new feature - see Implementing a JEP or Implementing a large change below. |
| Task | Tasks are used to track work that isn’t expected to result in a change in any code repository. They are used for related activities such as a new JBS version number, a build request, an update to a document etc. |
| New Feature | Not recommended for use. |
A Bug or Enhancement should only be used if the work is expected to result in a change in a code repository. A Bug or Enhancement with resolution Fixed is required to have a corresponding changeset in one of the OpenJDK repositories.
Indicating what releases an issue is applicable to
Knowing when an issue was introduced is important to determine the impact of the issue and where it needs to be resolved. While in some cases it may be clear, it is likely that on submission and during triage this won’t be known, instead we will have one or two data points from which we can begin to understand the range of releases which the issue impacts.
The Affects Version/s field is used to indicate which releases an issue is applicable to, and to avoid having to set it to an exhaustive list of impacted releases the following assumptions are used to give that range:
- If an issue is applicable to a feature release N, it is assumed
to be applicable to all (more recent) releases unless indicated
otherwise (see (Rel)-na
below).
- Note that if it’s reported against an update release then all we can say is that it’s applicable to all the following update releases, not necessarily the next feature release as it may have been introduced in an update. Given this, it is always important to try and reproduce the issue in the corresponding feature release as well as mainline.
- If an issue is applicable to release N, then it can’t be assumed that it is applicable to older releases less than N. It may be, but in general this is less important to know, as the majority of issues are only fixed in the latest feature release. If the issue is a crash or important in another way, then it becomes worthwhile to take the time to determine if it’s relevant to earlier LTS releases.
Another aspect is when the impacted code was added or removed from the JDK, which in either case limits the range of releases the issue impacts. Knowing that a feature was removed before the oldest currently maintained release means it can be resolved as Won’t Fix.
Setting the Affects Version/s field
Note that the Affects Version/s field is mainly used for bugs and bug-like tasks/sub-tasks etc. In general enhancements and enhancement-like tasks/sub-tasks should not have an Affects Version/s.
Set the Affects Version/s field to the lowest release where the bug has been seen.
- The Affects Version/s isn’t meant to be an exhaustive list of releases the issue is relevant to - it should initially be set to the release the issue was reproduced or identified on, and by implication it will be relevant to all releases past that point (see Usage of the (Rel)-na Label). If it’s later found to be applicable to an earlier release family then adding that earlier release is encouraged if the issue needs to be fixed in that release.
- Don’t add additional release values to Affects Version/s for the same release family. For example, if there is the value 11.0.2, don’t add 11.0.5, 11.0.7 etc. Adding an additional value for a separate release family where it’s still reproducible, e.g. JDK 21, is encouraged if there isn’t currently a feature release value set, or, it has been a few releases since it was last reproduced/reviewed. For example, if the Affects Version/s is JDK 8, but it is still relevant to the latest mainline release.
Usage of the (Rel)-na Label
Labels of the form (Rel)-na (eg. 17-na) should be used when a bug is not applicable to a more recent release family. For example:
Affects Version/s: 7u111, 8u131
add the label 9-na if the issue is not relevant to JDK 9 and above. Reasons why this would be the case include the fact that the source has been removed from a later release or rewritten such that the issue is no longer relevant.
Don’t:
-
use the label to indicate that a bug is not relevant to an earlier release, for example
Affects Version/s: 11.0.20, 17
the label 8-na would not be needed - as it doesn’t have a JDK 8 release, or earlier, value in the Affects Version/s, it is not relevant to JDK 8. Also see Usage of the (Rel)-wnf Label
-
add multiple -na labels: you only need one, for example don’t add both 9-na and 11-na — 9-na implies all following releases therefore 11-na, or 17-na etc. are not needed.
-
It’s not recommended to specify update releases like 17u4 or 21u in the label. Labels like 17-na and 21-na are in general enough.
Usage of the (Rel)-wnf Label
Labels of the form (Rel)-wnf (e.g. 11-wnf) should be used to indicate that a bug is not going to be fixed in a release that it’s applicable to, or any earlier releases. For example, 11-wnf states it won’t be fixed in JDK 11 and implicitly indicates it won’t be fixed in JDK 8 either.
Add a comment when adding a (Rel)-wnf label so that it’s clear for those looking at the issue, why it won’t be fixed in that release.
Examples

Guidelines for setting Affects Version/s
- Issue relevant to JDK 8 and all future releases.
- No need to add additional releases as they are implied.
- Adding the occasional LTS release value is ok.
- Use N-na to indicate that the issue is no longer relevant from that release, which could be due to the feature or platform being removed or the code being rewritten.
- Use N-wnf to indicate that a fix will not be backported to that release, or earlier.
Things to keep in mind when requesting an improvement
Unlike reporting a problem, when it comes to improvements, what constitutes a reasonable request can take discussion, and in general it’s encouraged that the mailing list for the area is used to suggest an improvement before filing.
Enhancements to the Java Language Specification and the JVM Specification are managed through the Java Community Process.
To find out which component to use for different bugs, consult the directory to area mapping.
Implementing a large change
When managing the work for a large change, especially when the work involves multiple engineers, it’s recommended that the work is distributed across one or more “implementation” issues which should be linked to the main enhancement with a “blocks” link along with any relevant CSRs. The enhancement shouldn’t be considered done until all the blocking elements are completed. The use of sub-tasks for enhancements is not recommended unless all the sub-tasks are relevant to the fix, if it were to be backported, for example JDK-8231641 or JDK-8171407.
Implementing a JEP
It’s recommended for JEPs that the implementation is spread across one or more Enhancements as described above.
Issue states
JBS only has a few states in which a Bug or Enhancement can be:
| Type | Covers |
|---|---|
| New | Initial state after an issue is filed. Bugs in the JDK Project must be taken out of the New state (“Triaged” - see below) in a timely manner. In general, triaging is recommended to be done for all issue types and projects as a sign that the issue is correctly filed, and will be seen by the right developers - this is especially important towards the end of a release. |
| Open | Once the issue has been triaged it will be in the Open state and will stay here until an assignee decides to work on it, at which point it’s encouraged that the “Start Work” option be selected to move it to In Progress. |
| In Progress | The In Progress state is used to show that the assignee is actively working on the issue. It has the optional sub-states (Understanding): Cause Known, Fix Understood, In Review. |
| Resolved | When the issue has been fixed it is Resolved using the Resolve action in JBS. |
| Closed | To finally close an issue it also needs to be verified using the issue’s regression test. |

JBS Issue Flow
Triaging an issue
For most JDK areas, triage is performed on a regular basis (at least weekly) by triage teams. Each triage team consists of Contributors who are area experts for a specific area or feature. If you haven’t been selected to be part of a triage team for a specific area you shouldn’t be triaging bugs in that area.
When triaging an issue, first give it a general review.
- If the issue is a duplicate, close it as such.
- If the issue belongs to a different area (it was filed in libraries, but it’s an HotSpot issue), transfer it to the correct component/subcomponent making sure that the state remains New.
- If the issue is incomplete, add a comment noting what is needed and resolve the bug as Resolved - Incomplete. This is the JBS way of saying “need more information”. If no more information is obtained within reasonable time, the issue should be closed (Closed - Incomplete).
Now that the issue is in the right component and has the basic information, the analysis continues to get a more detailed understanding of the issue, and what should be done:
- Ensure the priority is correct.
- An approach that has been used for getting a consistent view of priority is to consider three aspects of the issue: Impact of the issue; Likelihood of it occurring; and, whether there is a Workaround. The higher the impact and likelihood the higher the priority; then, having a workaround reduces that priority - but mostly where the impact and likelihood aren’t that severe.
- Ensure the Affects Version/s
field is correct (within reason).
- This may involve reproducing the bug, if doing so is fast and easy.
- In addition to the version where the bug was found, take
special care to also investigate if the bug affects mainline.
- See Indicating what releases an issue is applicable to for more details.
- For enhancements the Affects Version/s should be empty unless you feel that the enhancement is only relevant to a particular release family, and shouldn’t go into a future mainline release.
- Affects Version/s should never use any of the “special” values available in JBS like tbd, na, unknown, (Rel)-pool or similar. Only actual JDK release numbers should be used. If you want to reflect that an issue is relevant to an older release, use a family release value or an exact release if you know where the issue was introduced: 8, 17, 21u4.
- Set the Fix Version/s.
- A bug should be fixed first in the most recent version where it exists. If you don’t know what version the fix will go into set the Fix Version/s to tbd or the appropriate (Rel)-pool if the fix is for a specific release family. If there is a (Rel)-pool in the fix version Skara tooling will use that issue/backport when you integrate the fix for that release family.
- If the bug also exists in older versions it may require
backporting.
- The decision to backport to a release should be made inline with the guidelines of the lead for that release.
- There are two options for creating backport issues to track the backport: one is to create it manually once it’s agreed that the bug should be backported; the second, is to let the bots create the backport issue once you integrate the fix to the repository (see Working with backports in JBS). In most cases, letting the bots create the backport issue is preferred.
- For Project internal changes intended to be integrated to a Project repository rather than the JDK or JDK Updates repositories, the Fix Version/s should be set to internal, or if the Project is large enough to have its own repo-* fix version, use that.
- Only one Fix Version/s should ever be set. If the issue is to be fixed in additional releases then separate backport issues must be created (see Working with backports in JBS). There are exceptions to this rule for CSRs and Release Notes.
- Make sure the bug has all the required labels – see
JBS Label Dictionary.
- Changes that don’t affect product code, but are only against the regression test, or problem-listing: noreg-self
- Changes that don’t affect product code, but are only against documentation: noreg-doc
- Well contained issues that seem to be easy to fix: starter
- Enhancements that are pure cleanups: cleanup
- Project specific issues usually have their own labels as well
- Managing regressions - for a bug (B) where behavior has incorrectly changed from a previous fix (A) ensure that the label regression is added. Once it is known what fix caused the regression a caused by link should be added to ‘B’ or a causes link to ‘A’. A causes link would also be added to A if the fix causes a change of behavior (intentional or otherwise) or it is found after integration, that additional work needs to be done. In addition to adding a caused by link, set the Introduced in Version and Introduced in Build fields of ‘B’, based on which release ‘A’ was fixed in. Do not add a caused by link if there was no specific product fix which caused it, for example, the addition of a test which finds an underlying problem should not be linked.
At this point move the issue into the Open state.
Sensitive information (e.g. hs_err.log)
It may sound obvious, but avoid placing sensitive information in bug reports. Things like usernames, IP addresses, host names, and exact version information of third party libraries etc. may be crucial to be able to debug in some cases, but could also help an attacker gain information about your system. JBS is a public database that anyone can search, so be mindful of what you place there. In particular when attaching log files like the hs_err.log you should make sure that you are comfortable sharing the details exposed in it. Sometimes it may be better to leave a comment saying that these details can be obtained on request.
If you file a bug through the Bug Report Tool there’s a specific field that should be used to place sensitive information like this. Information placed there will not be part of the public bug report.
Updating an issue while fixing
Once you are made, or you make yourself, the assignee of an issue you take on the responsibility of moving the issue through to resolution - providing the current status, and ultimately leaving a record for others in the future to understand what happened. There are no set rules for how you manage the bug while you are assigned to it, as it depends on the type and importance of an issue. A simple update to the doc needs little to be done, fix the problem and close the issue; an intricate timing issue or crash should be handled differently - documenting your progress in identifying the problem (e.g. JDK-8212207, JDK-6984895, JDK-8287982), this is especially helpful if you ultimately move the issue to a different area as you have found that the problem lies elsewhere, or is closed as Won’t Fix. Your updates then provide a resource to others to better understand what has been done or the code itself. See The Importance of Writing Stuff Down for a good explanation as to why it’s important.
Some additional fields should be filled out or updated as you get a better understanding of the issue:
- The Description usually explains what went wrong and how the failure was found, then there’s some investigation and eventually the root cause is found. At this point the Summary should be updated to correctly describe the bug. The Description however should remain a description of how the failure was found.
- The Affects Version/s should be updated if you in your investigation finds that the issue is older than what is indicated by the current Affects Version/s.
Note: If during your investigation of the bug you determine that the issue is in the wrong component, make sure to move it back to the New state before moving it to the new component, so that it will be picked up by the component’s triage team. Make sure there is a comment outlining the reason for the move, as explained above.
Linking Issues
An important aspect of any issue is making clear how it is connected/related to other issues. This can occur at any stage of the issue’s lifecycle. For example, as information becomes available that might suggest a cause, or similar issue (relates to).
There are the following link types:
| Type | Usage |
|---|---|
| duplicate of | Normally set automatically when an issue is closed as a duplicate - see Closing issues as duplicates for more information. |
| backported by | Normally set automatically when creating a backport with the “More -> Create Backport” option, or by the Skara tooling. |
| CSR for | When creating a CSR with the “More -> Create CSR” option, a link is automatically created between the main issue and the new CSR. |
| blocks | For when other issues are dependent on the current issue being resolved/fixed before they can be. For example, when a fix is broken down into a number of parts the blocks link should be used to ensure they are all fixed before the main issue is considered resolved - see Implementing a large change. |
| relates to | Used to indicate a relationship between two issues. To avoid lots of relates to links, the links should have some significance in relation to the cause and/or fix, for the current issue. |
| causes/caused by | The causes link implies a stronger relationship than relates to. If an issue ‘B’ can be traced back to the fix for issue ‘A’ then ‘A causes B’ (or ‘B is caused by A’). |
Note: There should never be more than one type of link between two issues. It may be necessary to manually remove a link, e.g. relates to, if later a duplicated by or caused by link is added.
Resolving or Closing an issue
Once the work on an issue has been completed the issue’s Status should be in a “completed” state. There are two “completed” states: Resolved and Closed. These are accompanied by a Resolution and a Fix Version/s. Which combination of Status, Resolution, and Fix Version/s you should use depends on how the issue is completed.
Most resolutions are used to close an issue so that it ends up being Closed directly, but resolutions that indicates that a change has been integrated into a Project repository must go through the Resolved state. An issue in Resolved state needs to go through verification to end up as Closed. For the JDK Project in almost all cases the bots will transition the issue to Resolved/Fixed when the changeset is integrated to the repository.
The Fix Version/s field should indicate when an issue was fixed. The most common value for this field is a JDK version number. There are some special values available for this field in JBS, these should only be used for special cases as outlined in this Guide.
Note: An issue should never be closed if it has open sub-tasks.
| Status Resolution |
Covers |
|---|---|
| Resolved/Closed Fixed |
The resolution Fixed should be used only if a change has been integrated in a Project repository to address the issue, and the Fix Version/s must always correspond to the version where the change was integrated, or be one of the repo-* fix versions or internal. If there isn’t a fix in the repository (and so no associated changeset) then the issue should not be marked as Fixed. |
| Closed Won’t Fix |
Used when the issue is describing behavior which, while maybe problematic or not ideal, isn’t going to be changed - for compatibility reasons for example. |
| Closed Duplicate |
Used to indicate that the same issue is described in another JBS issue. See Closing issues as duplicates for more information. |
| Resolved/Closed Incomplete |
Used to indicate that the JBS issue doesn’t contain enough information to work on the issue. See Closing incomplete issues for more information. |
| Closed Cannot Reproduce |
Use when a reproducer is provided (or clear steps) but it’s not possible to see the faulty behavior. When you can’t reproduce an issue, where feasible try on the release the issue was reported against as a way of confirming that it’s indeed addressed on the latest release, rather than you not having the right environment in which to reproduce the issue. |
| Closed Other |
Used in rare cases where none of the other statuses fit the situation. |
| Closed External |
Use where the issue is due to a problem in a Java library (not part of the OpenJDK code base), an IDE or other external tool etc. Where known, it’s good to provide a link to the site where the issue should be reported. |
| Closed Not an Issue |
Use when the behavior is expected and valid (cf. Won’t Fix) and the reporter perhaps has misunderstood what the behavior should be. |
| Closed Migrated |
Used rarely, but can be seen when issues are transferred into another project by opening up a separate issue in that project, with the issue in the original project being Closed. |
| Resolved/Closed Delivered |
Used to close out issues where a change to the code isn’t required, common examples are Tasks, Release Notes, and umbrella issues for larger changes. Note that the verification step is always needed to move an issue from Resolved to Closed. If your issue doesn’t need verification (e.g. it’s an umbrella where each sub-task is verified as a separate fix) then please move the issue directly to Closed without going through Resolved. |
| Closed Withdrawn |
Withdrawn is essentially the partner state to Delivered for issues that would not have resulted in a fix to the repo, and also part of the CSR and Release Note process. |
| Closed Approved |
Used as part of the CSR process. |
| Challenge States | Exclude [Challenge], Alternative Tests [Challenge], and Reject [Challenge] are only relevant within the context of the JCK Project. |
| Future Project | This status is not recommended for use. |
| Rejected | This status should not be used. |
When an issue is closed as Won’t Fix, do not remove the Fix Version/s. It’s valuable information to know what version it was decided not to fix an issue in. The same goes for resolutions such as Duplicate, Cannot Reproduce and Not an Issue.
The fix version na should only be used on backport issues that is created by mistake. See How to fix an incorrect backport creation in JBS.
Closing issues as duplicates
If the same issue is described in another JBS issue then close one against the other as Closed/Duplicate. In general the newer issue is closed as a Duplicate of the older one, but where the newer issue has a clearer description, or more useful, up-to-date comments then doing it the other way round is ok as long as none of them has been Fixed already. If one of the issues has been Fixed the other one should be closed as a Duplicate of the Fixed issue. There may be other reasons to choose to close one or the other issue as the Duplicate. As always - use your best judgement to make the end result as good as possible.
Any issue closed as a Duplicate must have a “Duplicates” link to the duplicating issue.
Be mindful of labels on issues closed as Duplicate. Some labels need to be copied over to the duplicating issue, see for instance the tck-red-(Rel) label.
Closing issues without knowing what fixed it
If it’s determined that an issue has been fixed, but it’s unknown what change that fixed it, closing as Fixed is not an option as this requires a changeset in a project repository. Duplicate is also not an option since this requires a duplicate-link to the issue that fixed it. A common way to handle such cases is to close the issue as Delivered with the Fix version/s set to unknown. Closing an issue as Cannot Reproduce has also been common practice but is no longer recommended if it’s known that the issue has actually been fixed.
Closing incomplete issues
As mentioned above, issues that lack the information needed to investigate the problem are placed in status Resolved - Incomplete. Triage teams should monitor incomplete issues in their area and if needed ping the relevant person. When new information is received, the bug should be returned to status Open. If the required information hasn’t been obtained within reasonable time (3-4 weeks) the bug should be closed as Incomplete.
Verifying an issue
Once an issue is marked as resolved there is now the option of someone, other than the person that fixed it, of marking it as Verified to confirm that the issue is fixed after testing; marking it as Fix Failed if it didn’t solve the issue; or, Not Verified to indicate that it wasn’t explicitly tested. Note that the JBS UI doesn’t highlight when Fix Failed has been set, you need to look for the Verification field at the bottom of the left-hand column in the Details section.
Removing an issue
Removing a JBS issue is a rare extreme case that shouldn’t be part of the normal workflow. For this reason, removing issues is restricted to admins only. If you for some reason need to remove an issue, send an email to ops@openjdk.org. You need to provide the bug id and a well considered reason the issue should be removed.
Note that JBS issues are not removed just because something was a bad idea, or a reported issue turned out to be an embarrassing user mistake. Such issues are simply closed.
JBS labels
JBS labels are used to tag and group related issues. JBS labels are an open namespace, which means that anyone can create new labels at any time. In order to avoid confusion, however, it’s best to reuse existing labels where possible. Most areas have their commonly used labels to identify issues in their respective area. Make an effort to find and use these labels. This can be done by editing the Labels field of a bug and entering the first few characters of the label you want to add. JIRA will pop up an autocomplete window with existing labels that match that prefix. Then choose one of the existing labels. Using the autocomplete window is preferable to typing the whole label name (even if you’re a good typist) because it’s easy for minor spelling errors to creep in, which can inadvertently introduce multiple labels with spurious spelling variations.
JBS labels should not be used to write documentation - don’t try to write sentences using labels. Adding a number of random labels is unlikely to be helpful to anyone.
Labels are case sensitive When using labels in Jira gadgets (like pie charts, heat maps, and statistics tables) Jira will be case-sensitive and treat e.g. OpenJDK and openjdk as two different labels. Searching however is case-insensitive. This means that if you group a set of issues in a gadget based on a label, and then click one of the groups to see the list of issues, that list will contain more results than the gadget if there are usages of the label with different casing. This can be very confusing and for this reason the recommendation is to stick with the commonly used case for all labels, regardless of your personal taste for upper or lower case letters. Most labels are lower case only, but there are examples where upper case letters are used in the most common version of a label. Use of the autocomplete popup window (described above) when adding labels will avoid inadvertent introduction of labels with differing case.
JBS label dictionary
This table contains some frequently used JBS labels and their meaning. Please help keeping this dictionary up to date by adding your favorite labels. This table doesn’t dictate how to use labels, but rather document how they are used. That said, obviously it will help everyone if we try to follow a common standard and use similar labels in the same way across all entities that use JBS.
| Label | Description |
|---|---|
| (Area)-interest | Used to indicate that an area (usually a team or Project) is interested in the issue. This label doesn’t indicate ownership of the issue. E.g., redhat-interest, azul-interest, coin-interest |
| Used to indicate that an issue is related to a specific area (usually a feature or Project). This label doesn’t indicate ownership of the issue. E.g., graal-related, testcolo-related, doc-related | |
| (Rel)-bp | Used to indicate that a bug would be suitable for backport to a release (Rel). This isn’t a decision to backport, just a suggestion / recommendation. E.g., 11-bp |
| (Rel)-critical-request (Rel)-critical-approved (Rel)-critical-watch |
Used in the ramp down phases of specific releases to request approval of changes that requires Project lead approval (or similar) to be included. (Rel) is the release in question. E.g., jdk11-critical-request (Rel)-critical-approved
is used to signal that the change has been approved for inclusion.
E.g., jdk11-critical-approved |
| (Rel)-defer-request (Rel)-defer-yes (Rel)-defer-no |
Used to request deferral of changes that requires Project lead approval (or similar) to defer. (Rel) is the release in question. E.g., jdk12-defer-request (Rel)-defer-yes and (Rel)-defer-no are used to indicate wether the deferral has been approved or not. E.g., jdk12-defer-yes These labels are always placed on the main JBS issue, never on backports or subtasks. Further details are found in the JDK Release Process. |
| (Rel)-enhancement-request (Rel)-enhancement-yes (Rel)-enhancement-no |
Used in the ramp down phases to request the late inclusion of an enhancement. (Rel) is the release in question. E.g., jdk10-enhancement-request (Rel)-enhancement-yes and (Rel)-enhancement-no are used to indicate the response on the request. E.g., jdk10-enhancement-yes, jdk10-enhancement-no These labels are always placed on the main JBS issue, never on backports or subtasks. Further details are found in the JDK Release Process. |
| (Rel)-fix-request (Rel)-fix-SQE-ok (Rel)-fix-yes (Rel)-fix-no |
(Rel)-fix-request is
used in ramp down phase 2 to indicate that an issue would be of
interest to be integrated into release (Rel). E.g.,
jdk12-fix-request
(Rel)-fix-SQE-ok is used to
indicate that the issue will be covered by the test plan for
(Rel). E.g., jdk12-fix-SQE-ok |
| (Rel)-na |
Labels of the form 11-na or 21-na should be used when a bug is not applicable to a more recent release family. See Usage of the (Rel)-na Label. (Rel) can also refer to more general release atrifacts like oraclejdk-na, openjdk-na, and sap-aix-na to indicate that the issue doesn’t affect code included in that specific atrifact. |
| (Rel)-wnf |
Labels of the form 11-wnf or 21-wnf should be used to indicate that a bug is not going to be fixed in a release where it’s present. Note that there should only be one (Rel)-wnf label on any JBS issue. It is implied that earlier versions will not be fixed either. Also see Usage of the (Rel)-wnf Label. |
| (Team)-triage-(Rel) |
Used to indicate that (Team) has triaged this issue for release (Rel). It’s encouraged that all open bugs are triaged on a regular basis so that old bugs aren’t forgotten. It’s therefore common to see several triage labels on the same issue which helps keeping track of which bugs have been triaged for each release. E.g., oracle-triage-13 There are many label variants that include the word triage in some form. The form described above is the only one recommended. Please refrain from using other forms. |
| aot | Used to identify issues in the JVM feature Ahead of Time Compilation. |
| Deprecated. Was used to identify issues in Application Class-Data Sharing. The cds label is now used instead. | |
| c1 | Used to identify issues in the JVM JIT compiler C1. |
| c2 c2- .* |
Used to identify issues in the JVM JIT compiler C2. c2-.* labels are used
to identify different C2 features. E.g., c2-intrinsic, c2-loopopts |
| cds | Used to identify issues in the JVM feature Class Data Sharing. |
| cleanup | The cleanup label is used to indicate enhancements which has no semantic changes, whose only purpose is to make the code more maintainable or better looking. |
| compilercontrol | Used to identify issues in the JVM Compiler Control feature. |
| conformance | Used to identify all TCK related conformance issues. |
| docker | Used to identify issues in docker support. |
| footprint | Used to identify issues affecting Java SE footprint. Issues with this label should also have a performance label. |
gc-.* |
Used to identify issues in specific garbage collectors in the JVM. E.g., gc-g1, gc-shenandoah, gc-serial, gc-epsilon There are also labels in use to identify different GC features or areas rather than GC algorithms. E.g., gc-g1-fullgc, gc-largeheap, gc-performance Note that ZGC breaks this pattern and uses the label zgc. |
| graal | Used to indicate that this is a Graal issue. (Something that needs to be fixed in Graal rather than in the JDK.) |
| graal-integration | Reserved for Graal integration umbrella bugs. The automated integration script will break if this label is used for other bugs. |
| hgupdate-sync | Used to identify backport issues created as part of automatic syncing between releases. |
Deprecated. Was used to tag
bugs found in the HotSpot nightly testing. Since we are now running
tiered testing there is no more nightly HotSpot testing. See
tier[1-8]. |
|
| hs-sbr | Used to identify issues that are found in the “same binary runs”, a stress testing method used to find intermittent failures. |
[1-8] |
Deprecated. Was used to
identify which HotSpot tier a test failure was seen in. We
don’t separate HotSpot tiers from the JDK tiers anymore. See
tier[1-8]. |
| i18n | Used to identify issues in internationalization. i18n is short for internationalization meaning “i 18 letters and an n”. Used for bugs whose impact varies depending on a user’s writing system, language, or locale, but aren’t just a matter of locale data. The label isn’t needed for classes_text, classes_util_i18n, classes_awt_im, classes_fontprop, or char_encodings. |
| integration-blocker | Used to indicate that a bug is present in a downstream repository but not present in the upstream repository and is therefore blocking integration of downstream changes into upstream. |
| intermittent intermittent-environment intermittent-hardware |
An intermittent issue is one that fails sometimes but not always. The exact reason for the intermittent failure is per definition unknown. Once the reason has been identified the issue is no more considered intermittent. An issue isn’t intermittent if some characteristics has been found that triggers the failure consistently, even if the actual cause for the failure hasn’t been found. For instance if a test fails every time it’s executed on a specific host but not on other hosts it wouldn’t be considered intermittent as it fails consistently on that specific host. In other cases it may be that we know that a test sometimes is unlucky in some respect and fails due to this. This test could still be considered intermittent even though we know what the reason is if the reason itself appears intermittently. Some issues may seem intermittent when looking at test results, even though the reason for failing is actually known. One example is where a test fails consistently on a specific host, or due to specific conditions in the environment. These failures shouldn’t be considered intermittent but it may still be valuable to tag these in JBS with one of the labels intermittent-hardware or intermittent-environment. This will help to faster identify that the cause of the failure is known without having to read through the entire bug. A test that should be platform agnostic but is consistently failing on a specific OS would for instance be labeled with intermittent-environment, while a test that fails every time it’s run on some specific hardware would be labeled with intermittent-hardware. |
| jep-superseded | Used to tag JEPs that have been superseded by a newer version of the JEP. |
| jvmci | Used to identify issues in the JVM Compiler Interface. |
| maintainer-pain |
Used to tag bugs that for some reason is wasting time or in other ways are causing pain for the OpenJDK maintainers. Examples of issues that could be considered a pain:
There are other cases as well and there is some flexibility in the definition. If you see a problem that is causing pain for a large number of maintainers, add an explanation in the JBS issue to why you think the issue is a pain and add the label. If you have a maintainer-pain bug assigned to you please consider fixing it asap. If you chose not to work on the issue, you should at least be aware that you are choosing to waste others’ time and people will be affected by this choice. As with any issue the best way to deal with a maintainer-pain issue is to fix it. Another way to reduce the noise is to exclude the failing test. This is a viable option if there is a limited set of tests that are failing and the bug is actively investigated. When excluding a maintainer-pain issue, remember to move the maintainer-pain label to the JBS issue used to exclude. Leaving the label on the closed exclude-issue is helpful for tracking purposes. |
noreg-.*nounit- .* |
The noreg- Please note that the noreg- namespace is closed, meaning that no new noreg- labels should be added unless properly motivated, discussed, and agreed upon.
|
| performance | Used to identify an issue with noticeable performance impact. Either positive or negative. |
Deprecated. Was used to
indicate that a failure happened in product integration testing
(PIT). Since we are now running tiered testing there is no more
PIT. See tier[1-8]. |
|
| problemlist | One or more tests have been problem-listed due to this bug. |
| regression | Used to identify regressions. A regression is where behavior has incorrectly changed from a previous build or release. Ideally all regressions are identified and fixed before they are released, if not they must be fixed at latest in the following release after they are identified. All regressions must have the Affects Version/s set. |
| regression_(ID) | Deprecated. Formerly used to identify the fix that caused the regression, where known. Replaced by the use of the caused by link. |
| release-note | Used to indicate that the issue is a release note. See Release Notes. |
| release-note=yes release-note=no |
Used to indicate whether a change requires a release note or not. The labels are always placed on the main JBS issue, never on the actual release note issue. See Release Notes. release-note=done is deprecated and should no longer be used. |
RN-.* |
Used to indicate what kind of change the release note is for. See Release Notes. |
| starter | A starter bug is a well contained, small issue that is suitable for someone new to the codebase. |
| startup | Used to identify an issue as affecting Java SE startup performance. Issues with this label should also have a performance label. |
| tck-red-(Rel) |
Used to identify TCK conformance stoppers (e.g. failure of a valid TCK test that exists in a shipped TCK). The release number indicates which release of the TCK that failed. E.g., tck-red-11 If an issue with a tck-red-(Rel) label is closed as a Duplicate, the label must be added to the duplicating issue as well. There are tck-red labels without the release number out there as well. This usage is deprecated. |
| The labels test, test-only, and testbug are deprecated and should no longer be used. Use noreg-self to indicate that an issue is a bug in test code. | |
tier[1-8] |
Used to indicate which tier in the jdk/jdk CI pipeline. Use (Rel)-tier[1-8] for other CI pipelines,
where (Rel) is the name of the pipeline. E.g. 8u-tier1 |
| webbug | Used to identify a bug as submitted on bugs.java.com. |
| zgc | Used to identify an issue in ZGC. |
Cloning the JDK
Quick Links
After the initial release of the JDK source code into OpenJDK in
2007 the OpenJDK project moved from TeamWare to using Mercurial.
Starting in 2019 the source revision control has been moved to Git.
The complete source code for the JDK is today hosted at GitHub. You can browse the code directly
in the openjdk/jdk
repository, or download the code for offline browsing, editing,
and building using git clone.
$ git clone https://github.com/openjdk/jdk.gitopenjdk/jdk is the mainline JDK development
repository where the next major release of the JDK is being
developed. Other Projects have their own
repositories on GitHub.
Note that source may be available from other locations, for
example src.zip from a full JDK distribution. However,
OpenJDK contributions must use source from the appropriate OpenJDK GitHub repository since
other source distributions may contain older code or code which
differs due to licensing. Consult the Project’s documentation
or mailing lists to determine the
appropriate repository, development conventions, and helpful
tools.
If you intend to contribute patches, you should first fork the repository on GitHub and clone your own personal fork as shown below. To fork a Project on GitHub, go to the GitHub Project page and click the ‘Fork’ button in the upper right corner, then follow the on screen instructions.
This is the typical development model:

Diagram of upstream repos and user's clone
Pushes to your personal fork can be made either using HTTPS or SSH. These examples assume you have an SSH key installed on GitHub. If this is the first time you clone your personal fork of an OpenJDK repository you may want to create an SSH key to use with it. See Generating an SSH key below. Once you have your personal fork and an SSH key to go with it, go ahead and clone.
$ git clone git@github.com:OpenDuke/jdk.git
$ cd jdk
$ git remote add upstream https://github.com/openjdk/jdk.git
In the example above Duke cloned his personal fork of the JDK mainline repository using SSH. You should of course use your own GitHub username instead. Then, by adding a new remote named ‘upstream’, the clone is associated with openjdk/jdk. Doing this will allow the tooling to automatically create a PR on openjdk/jdk whenever a change is pushed to the personal fork. The way that works is that once the change has been pushed to the personal fork, and you navigate to the openjdk/jdk repository on GitHub, there will be a message saying that you just pushed a change and asking if you want to create a PR.
Working with git branches
It is strongly recommended to always create a
new branch for any change you intend to implement. If your PR gets
accepted, it will be squashed and pushed by the OpenJDK bots. This
means that if you make changes to your master branch,
it will diverge from the upstream master branch. This
in turn means that your repo will forever be out of sync with the
upstream repo, which will cause merge conflicts every single time
you want to update your repo from upstream. Having a separate
branch for each change also means that you can easily work on many
different changes in parallel in the same code repository. Unless
you know what you are doing, the recommendation is also to always
base your new branch on the master branch.
$ git switch -c JDK-8272373 masterHere we create a new branch called JDK-8272373
based on the master branch and set the repository up
to work in that new branch.
If you intend to work on a backport to a feature release
stabilization branch, your new local branch should of course be
based on the stabilization branch instead of
master.
$ git switch -c JDK-8272373 jdk23git switch was introduced in Git version 2.23. For
earlier versions of Git git checkout can be used
instead. However it is always recommended to use the latest
versions of all your tools when possible.
More information about how to work with git and the dedicated tooling that is available for OpenJDK can be found in the Project Skara Documentation. If you’re new to git you can also read more about how to work with it in one of the many fine git tutorials available on the Internet. For instance the Pro Git book. This guide doesn’t aspire to become another git guide.
Generating an SSH key
For security reasons you should always create new keys and use
different keys with each repository you clone. The
ssh-keygen command generates an SSH key. The
-t option determines which type of key to create.
ed25519 is recommended. -C is used to add
a comment in the key file, to help you remember which key it is.
While it’s possible to use SSH without a passphrase, this is
strongly discouraged. Empty or insecure
passphrases may be reset using ssh-keygen -p; this
doesn’t change the keys.
$ ssh-keygen -t ed25519 -C openjdk-jdk -f ~/.ssh/openjdk-jdk
Generating public/private ed25519 key pair.
Enter passphrase (empty for no passphrase):
Enter same passphrase again:
Your identification has been saved in /Users/duke/.ssh/openjdk-jdk.
Your public key has been saved in /Users/duke/.ssh/openjdk-jdk.pub.
The key fingerprint is:
SHA256:WS4jCQMtat75ZEue+so+Lgj7V/sdMtj1FTNkfNsCfHA openjdk-jdk
The key's randomart image is:
+--[ED25519 256]--+
|  ..       ..oE  |
|  ...       o+o .|
| . .o     .  o+.o|
|..   o . +    .=.|
|o . . o S o   .. |
|.. o +.+ + . .   |
|o.  *.+.+ . .    |
|o....=.  + .     |
| .=B=. .. .      |
+----[SHA256]-----+
~/.ssh/openjdk-jdk is a text file containing your
private ssh key. There’s a corresponding public key in
~/.ssh/openjdk-jdk.pub (as detailed in the example
above). You should never share your private key.
The public key on the other hand should be uploaded to
GitHub. Follow the steps below to
do that.
- Go to the GitHub settings for your account by choosing “Settings” in the menu by your avatar in the upper right corner
- Go to “SSH and GPG keys”
- Click “New SSH key”
- Title “OpenJDK” (or something else appropriate)
- Paste the content of
~/.ssh/openjdk-jdk.pubinto the text field- To get the content of the file you can for instance use
cat ~/.ssh/openjdk-jdk.pub - It will look something like this:
ssh-ed25519
AAAAC3NzaC1lZDI1NTE5AAAAIO8+egiIgWV+tE7LVVJmlR7WS2Lr3Fj7dXVo9HiasD6T
openjdk-jdk
- To get the content of the file you can for instance use
- Click “Add SSH key”
Now you are ready to clone your openjdk/jdk fork using SSH.
Making a Change
Quick Links
In case you jumped directly here and skipped reading the earlier sections of this guide, please keep in mind that there’s a lot more to it than just making a change in the code and submit a PR to GitHub. The list below shows the bare minimum required before a change can be accepted into OpenJDK.
- Discuss the intended change – See Contributing to an OpenJDK Project
- Make sure an issue id exists for the work – See Filing an issue
- Initiate a CSR request if your change have a compatibility impact – See Working with the CSR
- Fix the issue – See Cloning the JDK, Working with git branches, and Building the JDK
- Write regression tests and run relevant regression and unit tests on all relevant platforms – See Testing the JDK
- Create a changeset – See Working With Pull Requests
- Update the bug content – See Updating an issue while fixing
- Request a review of the changes – See Life of a PR
- Merge with the latest upstream changes and test again
- Integrate the changeset – See Working With Pull Requests
- Write a release note if appropriate – See Release Notes
Working with the CSR
Changes that have a compatibility impact will require a separate approval besides the code review. This is handled through a Compatibility and Specification Review, a.k.a. CSR. Compatibility impact can be things like requiring a specification change, directly affect an external interface, changing command line options, or otherwise alter the behavior of the JDK in ways that could cause issues for users when upgrading to the next JDK version.
See the CSR wiki for information on how to work through the CSR process.
The CSR must be approved before the change is allowed to be integrated to a feature release or update release repository. Feature design and implementation work may begin concurrently with the CSR review, but may need to be modified in response to CSR feedback.
Copyright Headers
All source code files in OpenJDK has a header with copyright statements and a license. Since this is legal documentation it shall not be updated or modified without seeking guidance from your legal representative. For that reason this guide can’t really give detailed information on what you can or should do. There are however a few generic things that can be clarified.
This is an example copyright/license header:
/*
 * Copyright (c) 2018, 2021, Oracle and/or its affiliates. All rights reserved.
 * Copyright (c) 2018, 2020 SAP SE. All rights reserved.
 * DO NOT ALTER OR REMOVE COPYRIGHT NOTICES OR THIS FILE HEADER.
 *
 * This code is free software; you can redistribute it and/or modify it
 * under the terms of the GNU General Public License version 2 only, as
 * published by the Free Software Foundation.
 *
 * This code is distributed in the hope that it will be useful, but WITHOUT
 * ANY WARRANTY; without even the implied warranty of MERCHANTABILITY or
 * FITNESS FOR A PARTICULAR PURPOSE.  See the GNU General Public License
 * version 2 for more details (a copy is included in the LICENSE file that
 * accompanied this code).
 *
 * You should have received a copy of the GNU General Public License version
 * 2 along with this work; if not, write to the Free Software Foundation,
 * Inc., 51 Franklin St, Fifth Floor, Boston, MA 02110-1301 USA.
 *
 * Please contact Oracle, 500 Oracle Parkway, Redwood Shores, CA 94065 USA
 * or visit www.oracle.com if you need additional information or have any
 * questions.
 */
This header has two copyright notices at the top (Oracle and SAP SE) and below them the license text.
As stated in the header, don’t make changes to the copyright notices or the license text below them. If your affiliation has a copyright notice at the top of the header, consult your legal representative on how to update it. If your affiliation doesn’t have a copyright notice, again consult your legal representative to see if you should add one. Do not update a copyright notice if you don’t belong to that affiliation unless explicitly asked by the affiliation in question.
If you create a new file, copy the license text from a nearby file. Do not add copyright notices for affiliations to which you don’t belong.
If you move code from an existing file to a new file, bring the entire copyright + license header over to the new file.
Changes Late in the Release
You should always aim to get your changes integrated as early in a release as possible to maximize the amount of testing done before release. If you risk running late, it’s almost always a better idea to defer the change to the next release rather than trying to squeeze it in in the last minute. The next release is only six months away, the world can wait even though you are eager.
Integrating during the rampdown phase is not recommended. The bar to integrate a change in the rampdown phase is considerably higher than during the normal development phase. See The JDK Release Process for more information. Also note that changes that are made late in the release shouldn’t expect localization since this in itself takes some time.
Building the JDK
Quick Links
The JDK build system is a fairly complex machine that has the
ability to build anything from a single module to a complete
shippable JDK bundle with various levels of debug capabilities, run
tests, install your newly built JDK on your system, or
cross-compile for some other system. The build uses
make and a few other tools that you will have to
install on your system before starting.
The JDK supports incremental builds. This means that if you have a complete build and make changes in just a single part of the JDK (e.g. a module or part of the JVM), only that particular part needs to be rebuilt. So subsequent builds will be faster and you can always use a make target that results in a complete JDK image without having to worry about actually building the entire JDK every time. Please note that the incremental build do have limits in its understanding of what you change. For instance, if you change behaviors or conventions in one module there may be other parts of the JDK that implicitly depends on these without make’s knowledge. For this reason you may have to rebuild several modules, or do a clean build if you change things that may have a wider impact.
The examples below show the steps taken to build the JDK source code. Please see Cloning the JDK for information on how to download it. These examples were written in the JDK 17 development time frame which is why the boot JDK used here is JDK 16. Note that the download links used here point to JDK 16 bundles. To build JDK N, use JDK N-1 as the boot JDK.
The configure script will tell you what additional packages you
need. In this first example several packages were needed since this
build was performed on a clean Ubuntu installation. The configure
script was run several times to get all the dependencies, but only
the commands actually needed to get the JDK built are included in
the log. This is just an example log, don’t copy the
apt-get install line. Instead run sh
./configure to see what packages you actually need on your
system.
$ wget https://download.java.net/java/GA/jdk16/7863447f0ab643c585b9bdebf67c69db/36/GPL/openjdk-16_linux-x64_bin.tar.gz
$ tar xzf openjdk-16_linux-x64_bin.tar.gz
$ sudo apt-get install autoconf zip make gcc g++ libx11-dev libxext-dev libxrender-dev libxrandr-dev libxtst-dev libxt-dev libcups2-dev libfontconfig1-dev libasound2-dev
$ cd jdk
$ sh ./configure --with-boot-jdk=$HOME/jdk-16/
$ make imagesThe built JDK can be found in
build/linux-x86_64-server-release/jdk. The exact path
depends on your build platform and selected configuration.
The second example is from a clean (newly installed) Mac running
MacOS Big Sur. Please note that in this case there are some steps
taken outside of the terminal. First XCode and the XCode command
line tools must be installed. It could be that the most recent
version of XCode that you get from App Store is too new to have
been properly tested with the JDK build. See
the JDK build instructions for supported versions and more
details in case you need to install an older version of XCode. In
this example Mac Ports is
used to install autoconf. autoconf can
also be installed using Homebrew and
surely through other sources as well.
$ curl https://download.java.net/java/GA/jdk16.0.1/7147401fd7354114ac51ef3e1328291f/9/GPL/openjdk-16.0.1_osx-x64_bin.tar.gz --output openjdk-16.0.1_osx-x64_bin.tar.gz
$ tar xzf openjdk-16.0.1_osx-x64_bin.tar.gz
$ sudo port install autoconf
$ sh ./configure --with-boot-jdk=$HOME/jdk-16.0.1.jdk/Contents/Home
$ make imagesIn this case the built JDK can be found in
build/macosx-x86_64-server-release/jdk.
Configuration options
The JDK build is extremely configurable. This list only contains
the most basic configure options needed to get you started. Use
configure --help to see a complete list of
options.
| Option | What it does |
|---|---|
--with-boot-jdk |
Tell configure what boot JDK to use to build the Java libraries. |
--with-debug-level |
Set the debug level. Available levels are
release, fastdebug,
slowdebug, optimized. |
Working with multiple configurations
Through the configure flags you will select what configuration
of the JDK to build. The name of the output directory for the build
depends on this configuration. In the example above the JDK ended
up in linux-x86_64-server-release. This means that we
made a release build of a 64 bit linux x86 version of the server
JDK. If we change some of these options the output directory will
be affected accordingly.
--with-debug-level is one example of a configure
option that will change the output directory name. Sometimes it
makes sense to have several different configurations in parallel.
For example while debugging some code you might want to have both a
debug build and a release build to be able to test it properly. The
directory naming scheme makes this very easy. Simply configure and
build the JDKs you need and they will end up next to each other in
the build directory.
In the example above we built a release image. To
build a debug image as well we can configure with
--with-debug-level=slowdebug. This will give us a JDK
where for instance asserts in the JDK source code are enabled. To
select which JDK to work with in later calls to make
add CONF=<configuration>.
$ sh ./configure --with-boot-jdk=$HOME/jdk-16/ --with-debug-level=slowdebug
$ make CONF=slowdebug images
$ ls build/
linux-x86_64-server-release
linux-x86_64-server-slowdebugMake targets
make images, as used in the example above, will
build a JDK image which is very close to what you’d get from
any JDK provider. There are several other make targets you can use
depending on what you’re looking for. The table below
contains some commonly used make targets.
| Target | What it does |
|---|---|
exploded-image |
This is the default make target that you’ll
get if you simply invoke make. |
image |
Builds a complete JDK image. A good target to use if you want to build a JDK for general usage or if you want to test something closer to the shipping product. This can also be a good target to use if doing something which might have a build aspect to it. |
<name>-image |
Build just the image for any of jdk, test, docs, symbols, etc. |
reconfigure |
Re-runs the configure script with the same arguments as given the last time. |
demos |
Builds the demos which for instance make it easy to test something UI related. |
docs |
Builds the javadoc. Note that a number of classes
in the javadoc API are generated during the build, so make
docs might do more than simply invoke javadoc,
depending on the state of your build. |
java.base |
Builds the base module. You can (re)build any
module with make <module>. |
hotspot |
Builds the JVM. Note that the JVM depends on
several other parts of the JDK, so make hotspot might
build more than just the JVM, depending on the state of your
build. |
clean |
Removes all files generated by make, but not those
generated by configure. Useful when doing significant renaming or
refactoring which may confuse the incremental build. To clean out a
specific module only use make
clean-<module>. |
dist-clean |
Removes all files, including configuration. |
There are many other targets available as well. Use make
help to find out more.
Testing the JDK
In addition to your own Java applications, OpenJDK has support for two test frameworks to test the JDK, jtreg and GTest. jtreg is a Java regression test framework that is used for most of the tests that are included in the OpenJDK source repository. The Google Test (GTest) framework is intended for unit testing of the C++ native code. Currently only JVM testing is supported by the GTest framework. Other areas use jtreg for unit testing of C++ code.
This section provides a brief summary of how to get started with
testing in OpenJDK. For more information on configuration and how
to use the OpenJDK test framework, a.k.a. “run-test
framework”, see doc/testing.md.
Please note that what’s mentioned later in this section, like GHA and tier 1 testing, will only run a set of smoke-tests to ensure your change compiles and runs on a variety of platforms. They won’t do any targeted testing on the particular code you have changed. You must always make sure your change works as expected before integrating, using targeted testing. In general all changes should come with a regression test, so if you’re writing product code you should also be writing test code. Including the new tests (in the right places) in your change will ensure your tests will be run as part of your testing on all platforms and in the future.
A few key items to think about when writing a regression test:
- A regression test should execute fast - a few seconds at most
- The test should only test the desired functionality - if you have several features to test, write more tests
- The test should pass reliably on all supported platforms - watch out for platform-specific differences such as path separators
- Binary files shouldn’t be checked in, if your test needs to use one, the test should create it in some fashion
- Avoid shell scripts and relying on external commands as much as possible
The jtreg documentation has a section on how to write good jtreg tests.
There are a few examples where it doesn’t make sense to write an explicit regression test. These should be tagged in JBS with one of the noreg-labels.
jtreg
In-depth documentation about the jtreg framework is found here: jtreg harness. jtreg itself is available in the Code Tools Project.
Below is a small example of a jtreg test. It’s a clean Java class with a main method that is called from the test harness. If the test fails we throw a RuntimeException. This is picked up by the harness and is reported as a test failure. Try to always write a meaningful message in the exception. One that actually helps with understanding what went wrong once the test fails.
/*
* @test
* @summary Make sure feature X handles Y correctly
* @run main TestXY
*/
public class TestXY {
public static void main(String[] args) throws Exception {
var result = X.y();
if (result != expected_result) {
throw new RuntimeException("X.y() gave " + result + ", expected " + expected_result);
}
}
}This example only utilizes three jtreg specific tags,
@test, @summary, and @run.
@test simply tells jtreg that this class is a test,
and @summary provides a description of the test.
@run tells jtreg how to execute the test. In this case
we simply tell jtreg to execute the main method of the class
TestXY. @run isn’t strictly
necessary for jtreg to execute the test, an implicit
@run tag will be added if none exists. However, for
clarity and in order to avoid bugs it’s recommended to always
explicitly use the @run tag.
There are several other tags that can be used in jtreg tests.
You can for instance associate the test with a specific bug that
this test is a regression test for. The bug id is written without
the JDK- prefix.
@bug 8272373You can add several bug ids in the same @bug tag,
separated by a single space. These bug ids refer to product bugs
for which a fix is verified by this test. JBS issues that track
changes to the test itself are not listed here.
You can also specify a number of requirements that must be fulfilled for jtreg to execute the test.
@requires docker.support
@requires os.family != "windows"
@requires os.maxMemory > 3G
@requires os.arch=="x86_64" | os.arch=="amd64"And you can specify if the test requires specific modules, or command line flags to run the test in several different ways.
@modules java.base/jdk.internal.misc
@run main/othervm -Xmx128m TestXYNote that you can have several @run tags in the
same test with different command line options.
jtreg also have support for labeling tests with keys using the
@key tag. These keywords can then be used to filter
the test selection. For instance if you have a UI test which needs
to display a window you’ll want to make sure the test harness
doesn’t try to run this test on a system which doesn’t
support headful tests. You do this by specifying
@key headfulAnother example is @key randomness that should be
used to indicate that a test is using randomness - i.e. is
intentionally non-deterministic.
There are many other keywords in use and their usage may differ between areas in the JDK. Make sure you understand the conventions for the particular area you are testing since these are just examples.
The jtreg documentation provides information on many more tags like these.
The compiler group has a section in their wiki with Guidelines for “langtools” tests.
Running OpenJDK jtreg tests
When configuring the OpenJDK build you can tell it where your
jtreg installation is located. When providing this information you
can later run make run-test to execute jtreg
tests.
sh ./configure --with-jtreg=/path/to/jtreg
make run-test TEST=tier1In the OpenJDK source tree you can find a directory called
test. There are a large number of tests in this
directory that are written to be used with jtreg.
make run-test TEST=test/jdk/java/lang/String/You can also run jtreg without invoking make. In this case you’ll need to tell jtreg which JDK to test.
jtreg -jdk:/path/to/jdk /path/to/testGTest
As mentioned the Google test framework is mainly used for C++
unit tests. There are several of these in the
test/hotspot directory. Currently, only the C++ code
in the JVM area is supported by the OpenJDK GTest framework. The
tests can be run without starting the JVM, which enables testing of
JVM data structures that would be fragile to play with in a running
JVM.
static int demo_comparator(int a, int b) {
  if (a == b) {
    return 0;
  }
  if (a < b) {
    return -1;
  }
  return 1;
}

TEST(Demo, quicksort) {
  int test_array[] = {7,1,5,3,6,9,8,2,4,0};
  int expected_array[] = {0,1,2,3,4,5,6,7,8,9};

  QuickSort::sort(test_array, 10, demo_comparator, false);
  for (int i = 0; i < 10; i++) {
    ASSERT_EQ(expected_array[i], test_array[i]);
  }
}
ASSERT_EQ is one example of an assertion that can
be used in the test. Below are a few other examples. A full list is
found in the Google
Test Documentation.
ASSERT_TRUE(condition);
ASSERT_FALSE(condition);
EXPECT_EQ(expected, actual);
EXPECT_LT(val1, val2);
EXPECT_STREQ(expected_str, actual_str);
ASSERT is a fatal assertion and will interrupt
execution of the current sub-routine. EXPECT is a
nonfatal assertion and will report the error but continues to run
the test. All assertions have both an ASSERT and an
EXPECT variant.
For more information on how to write good GTests in HotSpot, see
doc/hotspot-unit-tests.md.
Running OpenJDK GTests
When configuring the OpenJDK build you can tell it where your GTest installation is located. Once configured, use make to run GTests.
sh ./configure --with-gtest=/path/to/gtest
make test TEST=gtest
You can also use a regular expression to filter which tests to run:
make test TEST=gtest:code.*:os.*
make test TEST=gtest:$X/$variant
The second example above runs tests which match the regexp
$X.* on a specific variant of the JVM. The variant is
one of client, server, etc.
GitHub actions
GitHub has a feature called GitHub actions (GHA) that can be used to automate testing. The GHA is executed whenever a push is made to a branch in your repository. The bots will show the results of the GHA in your PR when you create or update it. The GHA in the JDK Project is configured to run a set of tests that is commonly known as tier 1. This is a relatively fast, small set of tests that tries to verify that your change didn’t break the JDK completely. In tier 1 the JDK is built on a small set of platforms including (but not necessarily limited to) Linux, Windows, and MacOS, and a few tests are executed using these builds. There’s also a set of other platforms for which GHA does cross-complilation builds.
In addition to the testing you run manually before publishing your changes, it’s recommended that you take advantage of this automated testing that the GHA offers. This will for instance allow you to run tests on platforms that you may not otherwise have access to. To enable this on your personal fork of the JDK on GitHub go to the “Actions” tab and click the big green button saying “I understand my workflows, go ahead and enable them”. If you don’t understand these workflows there’s a link to the actual file that describes them right below the green button.
In case of failures in the GHA it’s always a good start to try to reproduce the failure locally on a machine where you have better control and easier access to a debug environment. There have been cases where the GHA has failed due to issues unrelated to the change being tested, e.g. because the GHA environment was updated and changes were needed to the JDK GHA configuration. The configuration is in general updated fairly quickly, so in cases were you can’t reproduce the failure locally, consider re-running the GHA later.
Please keep in mind that the tier 1 tests run by the GHA should
only be seen as a smoke test that finds the most critical
breakages, like build errors or if the JDK is DOA. These tests can
never replace the targeted testing that you always must do on your
changes. There are several areas of the JDK that aren’t part
of tier 1 at all. To see exactly what tier 1 includes, please see
the various TEST.groups files that you will find in the
subdirectories of jdk/test/.
In the past there used to be a sandbox repository that could be used for testing purposes. With the move to Git this has been replaced by GitHub Actions.
Excluding a test
Sometimes tests break. It could be e.g. due to bugs in the
test itself, due to changed functionality in the code that the test
is testing, or changes in the environment where the test is
executed. While working on a fix, it can be useful to stop the test
from being executed in everyone else’s testing to reduce
noise, especially if the test is expected to fail for more than a
day. There are two ways to stop a test from being run in standard
test runs: ProblemListing and using the @ignore
keyword. Removing tests isn’t the standard way to remove a
failure. A failing test is often a regression and should ideally be
handled with high urgency.
Remember to remove the JBS id from the ProblemList or the test when the bug is closed. This is especially easy to forget if a bug is closed as Duplicate or Won’t Fix. jcheck will report an error and prohibit an integration if a PR is created for an issue that is found in a ProblemList if the fix doesn’t remove the bug ID from the ProblemList.
ProblemListing jtreg tests
ProblemListing should be used for a short term exclusion while a
test is being fixed, and for the exclusion of intermittently
failing tests that cause too much noise, but can still be useful to
run on an ad-hoc basis. ProblemListing is done in the file
ProblemList.txt. For more details about the
ProblemList.txt file see the
jtreg FAQ.
There are actually several ProblemList files to choose from in the JDK. Their location and name hint about what area or feature each file belongs to. Each file has sections for different components. All ProblemList files complement each other to build the total set of tests to exclude in jtreg runs.
test/hotspot/jtreg/ProblemList.txt
test/hotspot/jtreg/ProblemList-aot.txt
test/hotspot/jtreg/ProblemList-graal.txt
test/hotspot/jtreg/ProblemList-non-cds-mode.txt
test/hotspot/jtreg/ProblemList-Xcomp.txt
test/hotspot/jtreg/ProblemList-zgc.txt
test/jaxp/ProblemList.txt
test/jdk/ProblemList.txt
test/jdk/ProblemList-aot.txt
test/jdk/ProblemList-graal.txt
test/jdk/ProblemList-Xcomp.txt
test/langtools/ProblemList.txt
test/langtools/ProblemList-graal.txt
test/lib-test/ProblemList.txt
Use the suitable ProblemList and add a line like this in the proper section:
foo/bar/MyTest.java 4711 windows-allIn this example, MyTest.java is ProblemListed on
windows, tracked by bug JDK-4711.
Currently there’s no support for multiple lines for the same test. For this reason it’s important to always make sure there’s no existing entry for the test before adding a new one, as multiple entries might lead to unexpected results, e.g.
foo/bar/MyTest.java                        4710   generic-all
...
foo/bar/MyTest.java                        4711   windows-all
This would lead to sun.tools.jcmd.MyTest.java being
ProblemListed only on windows-all. The proper way to
write this is:
foo/bar/MyTest.java 4710,4711 generic-all,windows-allAlthough windows-all isn’t strictly required
in this example, it’s preferable to specify platforms for
each bugid (unless they are all generic-all), this
makes it easier to remove one of the bugs from the list.
A common way to handle the JBS issue used to problemlist a test is to create a Sub-task of the bug that needs to be fixed to be able to remove the test from the problem list again.
Remember to always add a problemlist label in the JBS issue referenced in the ProblemList entry. When the issue is fixed, the problemlist label can be removed from the JBS issue.
ProblemListing some, but not all, test cases in a file
Some tests contain several test cases and there may be a need to
ProblemList only a few of them. To do this use the full test name,
i.e. <filename> + # + <test case id>,
where test case id can be specified in the test header. If no id is
specified each test case can be referenced with id +
ordinary number of the test case in the test file.
Let’s assume we have four test cases in
foo/bar/MyTest.java:
/* @test */
/* @test id=fancy_name */
/* @test */
/* @test */
A ProblemList entry that excludes the first, second, and third test case would look like this:
foo/bar/MyTest.java#id0          4720  generic-all
foo/bar/MyTest.java#fancy_name   4721  generic-all
foo/bar/MyTest.java#id2          4722  generic-all
Due to an issue described in CODETOOLS-7902712
tests that contains more than one @test must actually
use this way to specify all test cases if all of them should be
ProblemListed. Specifying just the test name will not work.
Running ProblemListed tests
To run ad-hoc runs of ProblemListed tests use
RUN_PROBLEM_LISTS=true.
make test TEST=... JTREG=RUN_PROBLEM_LISTS=trueExclude jtreg tests using
@ignore
The @ignore keyword is used in the test source
code. This is mainly used for tests that are so broken that they
may be harmful or useless, and is less common than ProblemListing.
Examples can be tests that don’t compile because something
changed in the platform; or a test which might remove your
/etc/shadow. Use @ignore with a bug
reference in the test case to prevent the test from being run.
/**
 *  @test
 *  @ignore 4711
 */
In this example, MyTest.java is excluded, tracked
by bug JDK-4711. @ignore should generally
be placed directly before the first “action” tag
(e.g. @compile, @run) if any in the
test.
Dealing with JBS bugs for test exclusion
ProblemListing and @ignore-ing are done in the JDK
source tree, that means a check-in into the repository is needed.
This in turn means that a unique JBS issue and a code review are
needed. This is a good thing since it makes test problems
visible.
- Code review: ProblemListing a test is considered a trivial change.
- JBS issue: A JBS issue is obviously created for the bug that caused the failure, we call this the main issue. To exclude the test, create a subtask to the main issue. Also add the label problemlist to the main issue.
The fix for the main issue should remove the test from the
ProblemList or remove the @ignore keyword from the
test.
Triage excluded issues
After a failure is handled by excluding a test, the main JBS issue should be re-triaged and possibly given a new priority. This should be handled by the standard triage process. A test exclusion results in an outage in our testing. This outage should be taken into consideration when triaging, in addition to the impact of the bug itself.
Backing out a change
If a change causes a regression that can’t be fixed within reasonable time, the best way to handle the regression can be to back out the change. Backing out means that the inverse (anti-delta) of the change is integrated to effectively undo the change in the repository. Whether to back out a change or not will always be a judgement call. How noisy and frequent are the failures caused by the broken change? How soon can the fix be expected? If you want to avoid having your change backed out, you should make sure to let the relevant developers know that you are working on the fix and give an estimated ETA of the fix.
It will happen of course when the build is broken or the JDK is DOA and similar situations that a change is immediately backed out without further investigation. Backing out a change is however seldom the first course of action if the change has been done in accordance with the guidance in Working With Pull Requests. If, when investigated, it is found that a change didn’t go through relevant testing or there are other issues that should have been caught before integration if proper procedure had been followed, it’s quite possible that a change is backed out even if the author is desperately working on a fix. The JDK source code is deliberately menat to have a high bar for acceptance of changes. If something crawls in underneath that bar it should most likely be backed out.
The backout is a regular change and will have to go through the standard code review process, but is considered a trivial change. The rationale is that a backout is usually urgent in nature and the change itself is automatically generated. In areas where two reviewers are normally required, only one Reviewer is required for a backout since the person who is performing the backout also should review the change.
There are two parts to this task, how to do the bookkeeping in JBS, and how to do the actual backout in git.
How to work with JBS when a change is backed out
- Close the original (failed) JBS issue (O).
- “Verify” the issue and choose “Fix Failed”.
- If the intention is to fix the change and submit it again,
create a redo-issue (R) to track that the work
still needs to be done.
- Clone (O) and add the prefix
[REDO]on the summary - the clone becomes the redo-issue (R). - Make sure relevant information is brought to (R).
- Remember that comments aren’t automatically brought over when cloning.
- Clone (O) and add the prefix
- Create a backout-issue (B):
- Alternative 1 - the regression is identified directly.
- Create a sub-task to (R) with the same summary
prefixed with
[BACKOUT].
- Create a sub-task to (R) with the same summary
prefixed with
- Alternative 2 - an investigation issue was created
(I), and during the investigation backing out the
change is identified as the best solution.
- Use the investigation issue (I) for the backout.
- Change summary of (I) to the same as
(O) and prefix with
[BACKOUT]. - Move and change type of (I) to become a sub-task of (R).
- Alternative 3 - no redo issue was created.
- Create a backout-issue (B) with the same
summary as (O), prefix with
[BACKOUT]. - Add a relates to link between (B) and (O).
- Create a backout-issue (B) with the same
summary as (O), prefix with
- Alternative 1 - the regression is identified directly.
- If (O) had a CSR request, update the CSR issue
as follows:
- Add a csr-for link from the CSR to (R).
- Add a note to the CSR that explains the reason for the redo and the impact on the CSR.
- Move the CSR back into the Finalized state for re-review. (It’s necessary to first move the CSR back to the Draft state before moving it to the Finalized state.)
ProblemList entries and @ignore keywords will
continue to point to the original bug (unless updated at back out).
This is accepted since there is a clone link to follow.
How to work with git when a change is backed out
To backout a change with git, use git revert. This
will apply (commit) the anti-delta of the change. Then proceed as
usual with creating a PR and getting it reviewed.
$ git show aa371b4f02c2f809eb9cd3e52aa12b639bed1ef5
commit aa371b4f02c2f809eb9cd3e52aa12b639bed1ef5 (HEAD -> master)
Author: Jesper Wilhelmsson <jesper.wilhelmsson@oracle.com>
Date:   Wed Jun 23 20:31:32 2021 +0200

    8272373: Make the JDK mine
    Reviewed-by: duke

diff --git a/README.md b/README.md
index 399e7cc311f..4961acb2126 100644
--- a/README.md
+++ b/README.md
@@ -1,4 +1,4 @@
-# Welcome to the JDK!
+# Welcome to my modified JDK!

 For build instructions please see the
 [online documentation](https://openjdk.org/groups/build/doc/building.html),

$ git revert aa371b4f02c2f809eb9cd3e52aa12b639bed1ef5
[master d454489052d] 8280996: [BACKOUT] Make the JDK mine Reviewed-by: duke
 1 file changed, 1 insertion(+), 1 deletion(-)

$ git show d454489052dc6ff69a21ad9c8f56b67fdeb435ee
commit d454489052dc6ff69a21ad9c8f56b67fdeb435ee (HEAD -> master)
Author: Jesper Wilhelmsson <jesper.wilhelmsson@oracle.com>
Date:   Wed Jun 23 20:32:08 2021 +0200

    8280996: [BACKOUT] Make the JDK mine
    Reviewed-by: duke

diff --git a/README.md b/README.md
index 4961acb2126..399e7cc311f 100644
--- a/README.md
+++ b/README.md
@@ -1,4 +1,4 @@
-# Welcome to my modified JDK!
+# Welcome to the JDK!

 For build instructions please see the
 [online documentation](https://openjdk.org/groups/build/doc/building.html),
Backing out a backport
In rare cases it may be necessary to back out a backport from an update release without backing out the original fix in mainline. This will require a somewhat different procedure and will result in a small mess in JBS. It’s extremely important to add comments in all relevant issues explaining exactly what’s happened.
The steps to take in order to do this are described below. (M) used below refers to the main bug entry - the first fix that was later backported.
- Close the original (failed) JBS backport issue
(O).
- “Verify” the issue and choose “Fix Failed”.
- If the intention is to fix the backport and submit it again,
create a redo-issue (R) to track that the work
still needs to be done.
- Clone (M) and add the prefix
[REDO
BACKPORT]
on the summary - the clone becomes the redo-issue (R). - Add a relates to link between (R) and (O).
- Set Fix Version of (R) to the target release
for the backport - either the exact release if known, or
<N>-poolif it’s not critical which release the fixed backport goes into.
- Clone (M) and add the prefix
- Create a backout-issue (B):
- Alternative 1 - the broken backport is identified directly.
- Create a sub-task to (R) with the same
summary, but prefixed with
[BACKOUT
BACKPORT]
.
- Create a sub-task to (R) with the same
summary, but prefixed with
- Alternative 2 - an investigation issue was created
(I), and during the investigation backing out the
backport is identified as the best solution.
- Use the investigation issue (I) for the backout.
- Change summary of (I) to the same as
(M) and prefix with
[BACKOUT
BACKPORT]
. - Move and change type of (I) to become a sub-task of (R).
- Alternative 3 - no redo issue was created.
- Create a backout-issue (B) with the same
summary as (M) and prefix with
[BACKOUT BACKPORT]. - Add a relates to link between (B) and (M).
- Create a backout-issue (B) with the same
summary as (M) and prefix with
- Alternative 1 - the broken backport is identified directly.
- Add comments to (M), (R) and (O) explaining the situation.
The end result in JBS should look like this:

JBS structure after backout and redo of a backport
For this example in JBS see the 15.0.2 backport of JDK-8272373.
Rationale for using this model
The approach described here has both advantages and disadvantages. The key invariants that lead to this model are:
- A backported by link should only refer to issues of type Backport
- A bug id should never be reused for different patches in the same repository
Disadvantages of this model are that the list of backports in JBS will still list the old (failed) backport as the 15.0.2 backport, and the new backport will not be linked to using a backported by link. It is assumed that the advantages above outweighs the disadvantages and that the capital letter prefixes for the backout and the redo will be visible enough in JBS to alert that something fishy is going on.
Working With Pull Requests
Quick Links
Once you have made a change that you want to integrate into an OpenJDK code base you need to create a Pull Request (PR) on GitHub. This section assumes that you have previous experience from using git and GitHub, and won’t go into details of how those work. Still, the aim is of course to provide a useful guide, so send an email if more details are needed.
This section also assumes that you have already read I have a patch, what do I do? and followed all the steps there.
Please note that the description of a change should always be in the JBS issue. The GitHub PR can be a good place to discuss technical implementation details regarding your change, but it’s not the right place to describe the problem. Make sure you have a proper problem description in your JBS issue before publishing a PR.
Think once more
All code reviews in OpenJDK are done in public. Once you open your PR for public review the internet can see it and comment on it. Make sure your code is ready for it. Look through your comments, make sure that temporary code is gone, and make sure you have sanitized your method and variable names. Also, make sure you understand your code. Why is it working? What are the potential pitfalls? What are the edge-cases? If you haven’t already answered all these questions in the mail conversation that preceded this PR, it’s likely that you will need to answer them during the review.
It’s also worth taking the extra time to see if the change can be split into a few different separate changes. A large change will take more effort and thus attract fewer Reviewers. Smaller changes will get reviewed faster and get better quality reviews. You can compare proposing a single large change to proposing ten individual small unrelated changes. What happens in practice when all these ten changes are presented as one PR is that there’s a focus on say 5-6 of these smaller changes and no one really looks hard at the other 4-5. For complexity, even small changes that are hard to understand and test may be risky.
The timing of your change will also affect the availability of reviewers. The JDK runs on a six-months release cadence. During the months around the start of the ramp down phase most area experts will be busy working on their own changes and reviewing major features that are planned for the release. If you propose a change during this period (basically May-June, or November-December) it may take a long time before you get the required reviews.
Rebase before creating the PR
It’s likely that other people have integrated changes to the code base since you created your branch. Make sure to pull the latest changes and rebase your fix on top of that before creating your PR. This is a courtesy issue. Your reviewers shouldn’t have to read your patch on top of old code that has since changed. This is hopefully obvious in cases where the upstream code has gone through cleanups or refactorings, and your patch may need similar cleanups in order to even compile. But even in cases where only smaller changes have been done, the reviewers shouldn’t have to react to issues like “that line of code was moved last week, why is it back there?”.
Most changes are made to the master branch of the
mainline repository. In these cases, rebase using:
git rebase masterNote that if you are working on a backport to a stabilization
branch you should replace master above with the name
of the branch you are targeting. This would be the same name as
when you cloned the branch.
After the PR has been published, rebasing, force-pushing, and similar actions are strongly discouraged. Such actions will disrupt the workflow for reviewers who fetch the PR branch. Pushing new changes is fine (and even merging if necessary) for a PR under review. Incremental diffs and other tools will help your reviewers see what you have changed. In the end, all commits will be squashed into a single commit automatically, so there’re actually no drawbacks whatsoever to making commits to a PR branch during review.
Final check before creating the PR
Creating the PR is essentially the same as asking a large group of people to start reviewing your change. Before doing that, you want to make sure your change is done in every detail you have the power to control. These are a few of the things you should think about in order to avoid wasting people’s time on an unfinished change. (You may think that some of these are too obvious to even mention, but all of them are things that in the past have caused actual failures that broke the JDK for all developers out there.)
-
Is the copyright statement at the top of each modified source file correct?
-
Did you run a full build and all relevant tests on the final version of the change? It’s important to do this on the truly final version, as even an apparently trivial change in a comment can break the build.
-
Did you
git addall new files? -
Did you add regression tests for your change?
-
Did you run those new regression tests?
If you are unsure of any of these things but still want to go ahead and create the PR, don’t!
If you have an actual reason to create a PR before the change is
all done, make sure to create it in DRAFT mode. The
bot won’t add the rfr label or send emails to
labeled Groups as
long as the PR is in DRAFT mode.
Life of a PR
-
Make sure the PR is reviewable
There are changes that span across several areas, for example wide spread cleanups or the introduction of a new language feature. Accordingly, the number of lines of code touched can be quite large, which makes it harder to review the entire PR. In such cases, it may make sense to split the change into several PRs, most commonly by grouping them by module or area.
-
Make sure you target the correct branch
Many project repositories have several branches. Make sure your PR targets the correct one. This is of course especially important when not targeting the default branch. At the top of your PR, right below the title, it will say “NNN wants to merge X commit(s) into [branch]”. A typical red flag to watch out for is if your PR seems to include commits or changed files that shouldn’t be part of your integration. E.g. Seeing the “Start of release updates for JDK N” when backporting something to JDK N-1 is a bad sign.
-
Set a correctly formatted title
The title of the PR should be of the form “
nnnnnnn:
Title of JBS issue
” wherennnnnnnis the JBS issue id of the main JBS issue that is being fixed, and theTitle of JBS issueis the exact title of the issue as written in JBS. In fact, the title can be set to only the JBS issue id (nnnnnnn) in which case the bot will fetch the title from JBS automatically. If you are creating a backport PR, see Using the Skara tooling to help with backports for more details on the title requirements. -
Write a useful description
The description of the PR should state what problem is being solved and shortly describe how it’s solved. The PR description should also list what testing has been done. Reviewers and other interested readers are referred to the text in the JBS issue for details, but the description should be enough to give an overview. This assumes there’s useful information in the JBS issue, like an evaluation etc. If not, add it.
Remember that the description is included in many emails sent to lists with many receivers, so a too long description can cause a lot of noise, while of course a too short description won’t give the reader enough information to perform the review. If you have a lot of information you wish to add to your PR, like performance evaluations, you can put that in a separate comment in the PR.
-
Finish the change before publishing it
Each update to a published PR will result in emails being sent to all relevant lists. This is per design and it’s how we want it to be, but it also mean that if you publish a PR before you have gone through the final check mentioned above, and later find that a few more updates are necessary, a lot of people will get a lot of emails.
-
Make sure all relevant Groups are included
The bot will make an attempt to include the Groups that need to review your change based on the location of the source code you have changed. There may be aspects of your change that are relevant to other Groups as well, and the mapping from source to Groups isn’t always perfect, so make sure all relevant Groups have been included, and add new labels using
/labelif needed. Consult the Code Owners section if you are unsure of who owns the code you are changing. -
Allow enough time for review
In general all PRs should be open for at least 24 hours to allow for reviewers in all time zones to get a chance to see it. It may actually happen that even 24 hours isn’t enough. Take into account weekends, holidays, and vacation times throughout the world and you’ll realize that a change that requires more than just a trivial review may have to be open for a while. In some areas trivial changes are allowed to be integrated without the 24 hour delay. Ask your reviewers if you think this applies to your change.
-
Get the required reviews
At least one Reviewer knowledgeable in each area being changed must approve every change. A change may therefore require multiple Reviewers because it affects multiple areas. Some areas (e.g. Client and HotSpot) require two reviewers in most cases, so be sure to read the relevant OpenJDK Group pages for advice or ask your Sponsor.
Be open to comments and polite in replies. Remember that the reviewer wants to improve the world just as much as you do, only in a slightly different way. If you don’t understand some comment, ask the reviewer to clarify. Accept authority when applicable. If you’re making changes in an area where you’re not the area expert, acknowledge that your reviewers may be. Take their advice seriously, even if it is to not make the change. There are many reasons why a change may get rejected. And you did read the section Things to consider before proposing changes to OpenJDK code, right?
-
Updating the PR
You may need to change the code in response to review comments. To do this, simply commit new changes and push them onto the PR branch. The PR will be updated automatically. Multiple commits to the branch will be squashed into a single commit when the PR is eventually integrated.
If the set of files in the PR has changed, this may affect the Groups that need to review the PR. Make sure to adjust the PR labels accordingly.
If you want to update the title of the PR, remember that the one and only truth is the JBS issue, so the title must first be changed there.
After having made all updates needed to get to the final version of the change, remember to re-run relevant testing. Even minor changes may go bad and you don’t want to cause (another) build failure due to an updated comment.
-
Merge the latest changes
If your PR is out for review for a longer time it’s a good habit to pull from the target repository regularly to keep the change up to date. This will make it easier to review the change and it will help you find issues caused by other changes sooner. Typically this involves fetching changes from the
masterbranch of the main JDK repo, merging them into your local branch, resolving conflicts if necessary, and then pushing these changes to the PR branch. Pushing additional commits and merges into the PR branch is fine; they will be squashed into a single commit when the PR is integrated. Avoid rebasing changes, and prefer merging instead.If your PR is targeting some other branch than
master, make sure to merge the correct upstream branch (the target branch). Verify that your PR doesn’t include changes from some other branch (e.g.master) that aren’t supposed to be there.If there are upstream changes that might affect your change, it’s likely a good idea to rerun relevant testing as well. The GHA testing that’s done automatically by GitHub should only be seen as a smoke test that finds the most severe problems with your change. It’s highly unlikely that it will test your actual change in any greater detail - or even at all execute the code that you have changed in most cases.
-
Integrate your change
When you have the required reviews and have made sure all relevant areas have had a chance to look at your change, integrate by entering the command
/integratein a comment on the PR. If you are not yet a Committer in the Project, ask your Sponsor to enter the command/sponsorin the PR as well in order for your change to be allowed to be integrated. -
After integration
After you have integrated your change you are expected to stay around in case there are any issues with it. As mentioned above, you are expected to have run all relevant testing on your change before integrating your PR, but regardless of how thorough you test it, things might slip through. After your change has been integrated an automatic pipeline of tests is triggered and your change will be tested on a variety of platforms and in a variety of different modes that the JDK can be executed in. A change that causes failures in this testing may be backed out if a fix can’t be provided fast enough, or if the developer isn’t responsive when noticed about the failure. Note that this directive should be interpreted as “it’s a really bad idea to integrate a change the last thing you do before bedtime, or the day before going on vacation”.
Webrevs
Quick Links
As all OpenJDK Projects are hosted on GitHub, most code reviews takes place there. When you publish a PR to an OpenJDK repository the corresponding JBS issue will get a link to the code review in the PR, making this the natural place to go for review. OpenJDK do however provide other tools and infrastructure for code reviews as well: The webrevs.
Webrev refers to both the tool used to create them and its
output. The script, webrev.ksh,
is maintained in the Code Tools
Project. Please note that this version of webrev is for use
with mercurial and won’t work with the git based
repositories. You don’t actually need tools like this anymore
unless you want to host code reviews in other locations than
GitHub.
On the GitHub reviews you will find links to webrevs. These are automatically generated by the bot and are provided as a complement for those who prefer this style of code review. Many OpenJDK developers are used to the webrevs as this was the default way to provide code for review before OpenJDK moved to GitHub. Though webrevs are mainly deprecated today, they used to be a central part of OpenJDK development and you may still see people use the word as a synonym for code review, so they do deserve to be mentioned here as well.
File
storage for OpenJDK artifacts - cr.openjdk.org
The cr.openjdk.org server provides storage and
display of code review materials such as webrevs and other
artifacts related to the OpenJDK Community. This area can also be
used to store design documents and other documentation related
OpenJDK but not related to any specific Project that have an
OpenJDK wiki space for such purposes.
Any OpenJDK Author can publish
materials on the cr.openjdk.org server. Users can
upload files to temporary storage using secure methods
(rsync, scp, and sftp).
This site is for open source materials related to the OpenJDK Community only. Users uploading inappropriate materials will lose access and the material will be deleted. Please review the Terms of Use before using this server.
Get your SSH key installed
To use cr.openjdk.org you’ll need to get an
SSH key installed. See Generating
an SSH key for guidance on how to generate a key. Your public
key (~/.ssh/id_rsa.pub) should be mailed as an
attachment along with your JDK username to keys@openjdk.org. An administrator
will install your key on the server and notify you on completion.
This process may take a couple of days.
Users behind a SOCKS firewall can add a directive to the
~/.ssh/config file to connect to the OpenJDK
server:
Host *.openjdk.org
ProxyCommand /usr/lib/ssh/ssh-socks5-proxy-connect -h [socks_proxy_address] %h %p
See the ssh-socks5-proxy-connect man page and
ssh-config man page for more information. Other
systems may require proxy access via other programs. Some Linux
distributions provide the corkscrew package which
provides ssh access through HTTP proxies.
It’s recommended that all users check with their network administrators before installing any kind of TCP forwarding tool on their network. Many corporations and institutions have strict security policies in this area.
Reviewing and Sponsoring a Change
Quick Links
Two of the most important contributions you can make in the OpenJDK community are to review and sponsor changes for other developers. All changes needs to be reviewed. Many changes even need to be reviewed by more than one person. This means that in order to enable a fast-pased development experience, all developers need to review more changes then they produce themself.
If you are new to an area, reviewing changes is also a great way to learn the code and see what general styles and types of changes are relevant in the area. Be mindful though, if you don’t know the area well you should state this in your review comments.
New developers in the OpenJDK community don’t have the permissions needed to integrate changes to the repositories. This is a feature that ensures that all developers get familiar with the code, processes, and community before being allowed to actually make changes. To get their first changes in, the new Contributor needs the help of a Sponsor. The Sponsor’s role is to offer constructive advice and eventually integrate the sponsored contribution into the repository.
Sponsoring new contributions is an important activity - it’s how the engineering culture of a project gets passed on from the core group to new Contributors, from one generation to the next. Take pride in the value you provide to Contributors. Their success reflects well on you.
There are many different reasons to sponsor a change and depending on the situation the exact steps involved may differ significantly. An experienced developer hired into a larger team of OpenJDK developers is likely to get much of the required information by osmosis and will likely need less help from a sponsor than the enthusiast sitting at home with no prior experience of large scale software development. This text aims to highlight the steps involved in sponsoring a change but can’t cover all possible scenarios. As always, common sense takes precedence where the assumptions made here doesn’t apply to your use case.
Responsibilities of a Reviewer
As a Reviewer you have a responsibility to make sure changes are sound and align with the general direction of the area. If you, as a Reviever, review a change in an area that you don’t know well you probably shouldn’t be the one to approve the change.
Reviewers should be aware that they take full responsibility for the appropriateness and correctness of any changes in their area of expertise. If something goes wrong (e.g., the build breaks) and the change’s author is unavailable, they may be asked to deal with the problem. Potential Reviewers are encouraged to refuse to review code for which they aren’t qualified.
Reviewers should examine not only the code being added or changed but also the relevant unit or regression tests. If no tests are being added for a change that isn’t already covered by existing tests and have the appropriate noreg- label, the Reviewer should question this.
As a Reviewer, Contributors will look up to you for guidance to get their contributions into the project - your actions will determine whether Contributors will feel welcome and want to engage further with the project beyond their initial attempt, or not. Let’s not lose enthusiastic, engaged and technically competent Contributors due to a lack of communication. If you see a request in your area of expertise and you can’t address it, at least acknowledge receipt of the request and provide an estimate for when you’ll be able to give it your attention. A frank explanation of your time constraints or commitments will be appreciated and respected.
Reviewing a change on GitHub
Code reviews in OpenJDK happens on GitHub. This guide will hint at the most common steps to perform a review but it’s not a complete documentation of all features. For official documentation see the GitHub Docs.
When you arrive at a pull request there are a few different sections that you can browse through, Conversation, Commits, Checks, and Files changed. We will look at the first and the last of these.
Conversation
The Conversation section is where all discussion around the PR happens. Note that this section is intended for technical discussion around the actual implementation of a change. This is in general not the place to discuss the appropriateness of the change or have overarching design discussions, that should happen on the appropriate mailing lists. Yes, PR comments will be sent to the mailing lists as well, but it’s unlikely that all the right people will see it. PR mails sent to the mailing lists will have a subject indicating that it’s about the specific implementation in the PR. If the discussion is larger than just about the specific implementation, for instance around the design or future of the feature, then a much larger audience needs to be made aware of the discussion. A separate email thread with a proper subject is preferred in such cases.
You can either reply to existing comments by using the text field beneath each comment, or add a new comment by scrolling to the bottom of the page and use the larger text field where it says “Leave a comment”.
Reviews take time for everyone involved. Your opinions are much appreciated as long as they are on-topic and of a constructive nature. A comment of the form “I don’t like this” won’t help anyone to improve the change. Instead express what it is that you don’t like and give examples of how to do it differently. Always be polite and make sure you read through all previous comments before adding your own, the answer you are looking for may already have been given.
Note that GitHub will collapse comments if there are many of them, and if an issue is marked as resolved. This means that you have to be observant and may have to dig around a bit to find all comments in the PR.
Never ask the author of a change to fix unrelated issues in the code that you find during your review. Such issues should be handled through a separate JBS issue and PR.
Files changed
The Files changed-section is where the actual change is presented. On the left hand side there’s a list of all files changed. This is useful to get a quick overview and to see if the change touches an area that you need to review.
The diff view is pretty straight forward, red stuff has been removed, green stuff has been added. You can configure (among other things) if you want a unified diff or a split view, if you want to hide whitespace changes, what types of files you want to show, and if you want to show the entire change or just what’s happened since your last review.
When you hover the text in the change a blue square with a plus sign pops up to the left of the line. Click it to add a comment about the change on the corresponding line. When you create your first comment you have the option to simply add a single comment or to start a review. In general you want to start a review so that all your comments are gathered in the same context when emails are sent out etc. You can also attach a comment to a file rather than to a specific line in the file by using the speech bubble icon at the top right.
When a complete file has been reviewed there’s a “viewed” checkbox at the top right that can be used to hide the files that you are done with. This is useful for changes that involve many files.
Once you have looked through all the changes and added all your comments, the green button at the top right of the screen “Review changes” is used to finish your review. You can add a final comment to sum up your findings and then choose whether you just want to provide your comments, if you want to approve the changes, or request that changes are done before the change can be approved. Finally click “Submit review” to publish your thoughts.
Trivial changes
A change that is small, well contained, and that makes no
semantic changes can be called trivial. Typical examples
are fixing obvious typos or renaming a local identifier. A trivial
change can also be integrating an already-reviewed change that was
missed in an earlier integration (e.g., forgot to add a file) or
generated changes like a git
revert. It’s up to the author of a change to claim
that the change is trivial in the RFR, and it’s up to the
Reviewer whether
to approve such a claim. A change is trivial only if the Reviewer agrees that it
is. A trivial change doesn’t need to wait 24 hours before
being pushed, and it only needs one Reviewer, even in areas
where stricter rules for integration normally apply.
Volunteering to sponsor a contribution
In an ideal situation opportunities to sponsor contributions occur in the OpenJDK mail lists. Since Contributors are encouraged to discuss their intended changes before they submit a patch, the ideal time to declare your sponsorship is during that initial conversation. As a Sponsor you should offer advice and collaborate with the Contributor as necessary to produce a high-quality patch. In addition to sponsoring changes to code you regularly maintain, there may be other areas where you can serve as a Sponsor.
After publicly committing to sponsoring a contribution, you need to “claim the sponsorship request” in JBS unless the Contributor already has a JBS account and can assign the bug to themself. To do that you need to perform three steps:
- Assign the bug to yourself.
- Add a comment providing the name of the Contributor and a summary of the approach to solving the problem.
- Set the bug’s Status to In Progress.
If the contribution doesn’t already have an associated OpenJDK bug then create one in JBS.
It should be noted that claiming the sponsorship can take many other forms. In cases where a change has been discussed, or a starter bug has been picked up and fixed even though a sponsor hasn’t been identified yet it may be as simple as just showing up at the PR and sponsor the change once it’s been reviewed.
Responsibilities of a sponsor
As a sponsor, you aren’t technically required to review the change, other Reviewers may already have looked at it or signed up to review. But it will be your name on the commit so you should do whatever you feel is needed to be comfortable with that. You may need to work with the Contributor to make any necessary changes, until you and the Contributor are satisfied with the result, and you are satisfied that the proposed contribution will pass any relevant review and testing. That may take more than one iteration in the worst case. You may also need to help out with any process or practical questions around the OCA, GitHub PRs, and specific requirements in the area or project.
To integrate the change the Contributor should use the command
/integrate on the PR as prompted by the bots. Once
that is done, you as a sponsor enter the command
/sponsor in a comment on the PR.
Once the change has been integrated you may need to keep an eye out for any reported test failures and be prepared to investigate if such failures stem from the change you sponsored, and if so, work with the Contributor to resolve the issue.
Backporting
Development of the latest version of the JDK often results in bug fixes that might be interesting to include in some of the JDK Update releases still being maintained or in a feature release stabilization branch. Moving a fix from a more recent release train (e.g. JDK 21) to an older release train (e.g. JDK 17) is called backporting.
The guideline for what to backport into a specific release will vary over the lifetime of that release. Initially more fixes are expected to be backported as new features and large changes introduced in a mainline release stabilize. Over time the focus will shift from stabilization to keeping it stable - the release will go into maintenance mode. This means that bug fixes that require larger disruptive changes are more likely to be made in mainline and backported to more recent release trains only, and not to older release trains.
Over time it’s likely that the code base will diverge between mainline and any given update release, and the cost of backporting will increase. The cost in this case is not only the effort needed to perform the actual backport, but also the cost inferred by bugs introduced by the backport. This should be taken into consideration when deciding if a change should be backported or not. For more details on how to reason around what to backport, this email from JDK 8 Updates Project lead Andrew Haley has some guidelines for JDK 8u. The reasoning in this mail is specific to JDK 8u, but will in general apply to any JDK release in maintenance mode.
Any change that originally required a CSR will require a new CSR to be backported unless the backport was covered by the initial CSR. Changes to Java SE specifications cannot be made in an update release without a Java SE Maintenance Release. CSR-related issues affect interfaces and behavior and must be very carefully scrutinized.
Backporting to a feature release stabilization branch
During ramp down of a feature release there are two branches of
the mainline repository in play, the release stabilization branch
for the outgoing release, and the master branch where
the next release is being developed. Any change going into the
release stabilization branch is likely to be desired in
master as well. When making a change intended for both
the stabilization branch and master, you should always
create your pull request targeting master first, and
then, once the pull request is integrated, backport the resulting
commit to the release stabilization branch. For bug fixes that are
only applicable to the release stabilization
branch, regular pull requests targeting the stabilization branch
should be created.
Please note that special rules applies during ramp down regarding what can and can’t be included into the stabilization branch. See the The JDK Release Process for more information.
Backporting multiple related changes
Ideally fixes should not be backported until there has been enough time for any regressions or follow-on issues to have been identified. Then, when looking to backport a fix the developer should look for both blocked by and causes links in order to understand the complete set of fixes that should be backported.
When backporting a number of changes that are dependent on each other, like a change with a tail of bug fixes, it can sometimes seem attractive to merge all those commits into a single change to avoid backporting a broken change. Please don’t. The general recommendation is to backport each commit individually. There are several reasons for this recommendation.
If, for instance, there are other changes between the original one and the followup fix(es) there may be a dependency on other changes that are unrelated to the issue itself. By merging the original change, the fix(es), and the unrelated changes to meet the dependency, a single very different change is created. It’s unlikely that this change will match the description in the single JBS issue used for the merged backport. Backporting each commit individually will preserve the git history and make it easy to figure out what has actually been backported.
Testing each individual change is more likely to find issues
than just testing the single merged change. It’s also easier
and less error prone to use the /backport command on
each commit instead of manually cherrypick and deal with the merges
etc.
And finally, if backporting each commit individually, the JBS records will clearly indicate that the followup changes have been backported as well. This is important as there is tooling that verifies that everything is done in the right way. That tooling will be confused if it can’t deduct from JBS what has happened.
Working with backports in JBS
Terminology
Main issue - The top issue in a backport hierarchy. Eg. JDK-8272373 is a main issue, while JDK-8277498 and JDK-8277499 are backport issues of this main issue.

Example of backport hierarchy
In general there’s no need to create backport issues in JBS manually. All work that’s done in JBS in preparation for a backport (requesting approvals etc) is done in the main issue. The backport issue will be created automatically by the bots when you integrate the change to the source code repository.
There can be cases where it’s desirable to create a
backport issue before the fix is done, e.g. if a CSR needs to
be filed. In these cases set the Fix
Version/s of the backport to N or
N-pool, where N is the release train the
backport is targeting. E.g. 17-pool. Please note that
even if a backport issue is created ahead of time, all work done in
JBS for approvals and similar is still done in the main issue.
Obviously it’s possible to set the Fix Version/s to the exact release the backport
is targeting, but in general this isn’t recommended unless
you are targeting a feature release in ramp down. When a change is
integrated to an update release repository, the bots will look at
the main issue as indicated in the PR title, and look for backports
with the current N.0.x release version as Fix Version/s, if no such backport is found they
will look for N-pool, and if that isn’t found
either, a new backport issue will be created. This means that if
the backport has an exact Fix
Version/s set, but is delayed and misses the release
indicated by this Fix Version/s, a
new, superfluous backport issue is created with a small mess as the
result. (See How to fix an
incorrect backport creation in JBS.)
Setting the Fix Version/s of a
backport targeted to an update release to N is always
wrong. JDK N has already been released (or it
wouldn’t be an update release) and can’t get any more
fixes.
Requesting approvals for backports
In order to be allowed to integrate a change to one of the
OpenJDK update development repositories (e.g. jdk17u-dev),
an approval is required. The official
process for how to request push approval for a backport
describes in detail how to work with JBS when requesting approvals.
In short, there’s a label jdk<release>u-fix-request that should be
added to the main JBS issue. Also put a motivation as to why the
issue needs to be backported as a comment in the main issue. Once
the label and motivation has been added, wait for the maintainers
of the release to approve your request. The approval will be
indicated with a label, jdk<release>u-fix-yes, added to the main
issue.
If the update release is in ramp down, changes are integrated to
the release repository (e.g. jdk17u).
During ramp down the bar to get changes in is significantly higher
and fixes need to be approved with jdk<release>u-critical-request /
jdk<release>u-critical-yes.
If your request to backport a change is denied, but you for some reason already created the backport issue in JBS (why?!), the backport issue should be closed as Won’t Fix.
Using the Skara tooling to help with backports
The Skara tooling includes support for backports. The official
Skara documentation describes in detail how to work with the
tooling to create backport PRs on GitHub or using the CLI tools. As
described in the documentation, the
/backport command can be used on a commit or a PR
to create the backport PR:
/backport jdk21u-dev
/backport jdk jdk23
/backport :jdk23
In the first example we backport the change to the JDK 21 update
release. To backport to other update releases, replace
jdk21u with the corresponding name for the target
update repository.
The second and third example above will backport the change to a
stabilization branch, in this case JDK 23. As before
jdk is the name of the target repository, and
jdk23 is the name of the stabilization branch.
Using the /backport command is the recommended way
to perform backports as the tooling will automatically handle all
the necessary steps in the background. If a backport PR is manually
created, set the PR title to Backport <original commit
hash>. This ensures that the bots will recognize it as a
backport as opposed to a main fix specifically targeting an older
release. One can tell whether or not the bots recognized a PR as a
backport by the backport label being
added if it’s recognized.
How to fix an incorrect backport creation in JBS
If an issue is targeted to a release and a fix referring to that issue is integrated to a different release repository, then a backport issue is automatically created in JBS. Usually this is a “good thing”, e.g., when you are backporting a fix to an earlier release, but not always… If the main issue is targeted to a later release (due to schedule planning) but someone finds the time to fix that issue in the current release, or if the main issue is targeted to a feature release in ramp down and the fix is integrated to the master branch, then the issue should be retargeted to the correct release before integrating the fix. However, sometimes we forget.
Here’s how to fix that:
In this example a fix was integrated to JDK N+1 (the mainline master branch) while the JBS bug was targeted to JDK N (a feature release in ramp down). The same procedure can be used in the opposite situation, when a fix has been integrated to JDK N when the JBS bug was targeted to JDK N+1, by switching N and N+1 below. Remember, to keep the record clean for the future, what matters the most is that the bug id used in the commit comment is the main bug, and that the “backports” (regardless of if they are to earlier or later releases) are Backport type issues of that main issue. Also make sure there are never more than one Backport issue of the same main issue targeted to any given release.
-
Reopen the backport issue that was created automatically
- Use a comment like the following (in the reopen dialog):
This change was integrated while the main issue was targeted to 'N'. The main issue has been reset to fixed in 'N+1', this backport issue has been reset to fix in 'na' and closed as Not An Issue to avoid confusion.- Change the Fix Version/s from ‘N+1’ to ‘na’.
- Close the backport issue as Not an Issue. Note: Closed, not Resolved
Even if you intend to backport the issue from ‘N+1’ to ‘N’ you shouldn’t reuse this backport issue. The existing (bad) push notification comment and the later to be added correct push notification comment will look very similar and it’s just a disaster waiting to happen to deliberately add these to the same issue.
-
Clean up the main issue
- Copy the push notification comment from the backport issue to the main issue, e.g.:
Changeset: 12345678 Author: Duke <duke@openjdk.org> Date: 2020-10-23 15:37:46 +0000 URL: https://git.openjdk.org/jdk/commit/12345678- Add a comment like the following to the main issue:
This change was integrated to 'N+1' while this main issue was targeted to 'N'. This issue has been reset to fixed in 'N+1' and the Robo Duke entry was copied here.- Reset the main issue Fix Version/s from ‘N’ to ‘N+1’.
- Resolve the main issue as Fixed in build “team” or in build “master” depending on where the fix was integrated - or to an actual build number if the change has already made it to a promoted build (look in the backport issue if you are unsure). Integrations to ‘openjdk/jdk’ are fixed in build “master” and integrations to other Project repositories are fixed in build “team”.
Release Notes
Release notes for a product such as the JDK are part of the release deliverables providing a way to highlight information about a fix, such as when it may have changed behavior, or when it’s decided not to fix something. While what should go into a release note isn’t something that can be precisely defined, it should describe changes that are important for a user to take into account when they are upgrading to the specific version. While release notes should not duplicate information in other documents, they can serve to highlight that a change has been made.
Release notes are associated with a JBS issue that has been fixed (or in some cases not been fixed) in a release and are generated with each build of a release. Any note should be considered as an integral part of the fix process, rather than waiting until the end of the release to determine what to write. In OpenJDK, release notes are currently being generated for the JDK and JDK Updates Projects.
Writing a release note
Writing the release note is the responsibility of the engineer who owns the issue. The note should be generated before the fix is reviewed, or in the case of known issues, when it’s determined that a fix won’t be possible in the release the issue was found in.
When writing a release note, be prepared for rather picky review comments about grammar, typos, and wording. This is for the sake of the Java community as a whole, as the language of the release note sets the tone for many blogs and news articles. For a widely used product like the JDK, the release notes are often copied verbatim (including typos) and published to highlight news in the release. This means that we need to take extra care to make sure the text in the release note is correct and follows a similar style.
The release note itself is written in a JBS sub-task of the issue that is used to integrate the change. There are a few steps to follow for the release note to find its way from JBS to the actual release note document.
-
Create a sub-task (More → Create Sub-Task) for the issue that requires a release note - the main issue, that is, the JBS issue that is used to integrate the original change, not for backports or the CSR (if there is one).
-
For the newly created sub-task, follow these steps:
- While the Priority of the sub-task is set by default to be the same as the priority of the issue itself, it can be changed to adjust in what order the release note is listed compared to other release notes in the same build or release note section.
- Set the Assignee to the same person who owns the main issue.
- The Summary should be a one sentence synopsis that is informative (and concise) enough to attract the attention of users, developers, and maintainers who might be impacted by the change. It should succinctly describe what has actually changed, not be the original bug title, nor describe the problem that was being solved. It should read well as a sub-section heading in a document.
- Prefix the Summary with “Release Note:”.
- Enter the text of the release note in the Description field using markdown formatting, following the CommonMark specification. While the markdown won’t be rendered in JBS, you can use dingus to see what the release note will look like. Note that Github style ascii table formatting is supported but will not display correctly in the dingus page. For more information see General Conventions for Release Notes below.
- Set Component/s and Subcomponent to the same values as the original bug.
- Set Affects Version/s to the release versions for which the release note should be published.
- Add the release-note label. This is required for the release note to be included in the release notes.
- Add the proper RN-label if applicable to indicate what section of the release notes it should be included in (see RN-labels below).
- Set the Fix Version/s to the same value that the main issue - in almost all cases this will be the version of mainline.
-
Have the release note ready to be reviewed at the same time as the code is reviewed. If it’s later determined that a release note is necessary, then go back to the same engineers who reviewed the fix to review the release note. Special care should be taken when writing a release note that will cover changes related to a vulnerability fix in order to avoid describing technical details of how it could have been exploited.
-
When you are done, Resolve the release note sub-task as
Delivered. Only release notes where the sub-task has been resolved asDeliveredis considered to be part of the EA/GA release notes. To avoid mixing up the release notes with the code fixes that have gone into a particular release or build, we don’t useResolved/Fixed.
If you see an issue you feel should have a release note but you are not the assignee of the bug, then add the label release-note=yes to the main bug (not on a backport nor a sub-task). This acts as a flag to make sure that the release note is considered. This can be done even with fixes that have been shipped already if it’s noticed that there is confusion around the change. If, after discussion, it’s decided that a release note isn’t required either remove the label, or change it to release-note=no if it makes sense to have a clear indication that a release note isn’t required for the fix. The label release-note=yes can be removed once the release note sub-task has been created.
For examples of well written release note issues in JBS, see JDK-8276929 or JDK-8278458.
General conventions for release notes
The following are general practices that should be followed when creating release notes.
-
Release notes should be no longer than 2-3 paragraphs.
-
Don’t repeat information that will be included in updates to the docs, keep it to a high level summary or key changes.
-
Note that where the changes are more fully documented in the JDK documentation, then refer to that document for details. When covering a change in behavior provide some idea to what can be done if a developer or user encounters problems from the change.
-
Don’t include graphics etc. Refer to the main docs if there are more details that need explaining.
-
Don’t include your name or affiliation, make sure however, you are the assignee of the release note sub-task.
-
If you have a < in the Summary then use
<. For <’s in the Description surround them by back-ticks. -
Avoid using Latin and abbreviations in the release note.
- Use “also known as” instead of “aka”
- Use “that is” or “to be specific” instead of “i.e.”
- Use “for example” instead of “e.g.”
-
The Summary should be in title case instead of sentence case.
- Example: Decode Error with Tomcat Version 7.x
-
The Description should be standardized to follow this pattern:
- Sentence stating the change that was made
- Background info/context
- Example: A new system property,
jdk.disableLastUsageTracking, has been introduced to disable JRE last usage tracking for a running VM.
Advanced options
- JEP release notes
- Summary - If the change is an actual JEP, use the JEP title.
- Description - the JEP Summary text have already been heavily reviewed and also approved by the Project lead. It should be the first sentence in the release note description. That would be analogous to the “change that was made” sentence in other release note descriptions. The remaining text would be composed of the background info from the JEP.
- Description - The JEP release note description should contain the link to the JEP.
- Labels - The release-note=yes label should be placed on the JEP issue itself.
- Single release note for multiple changes
- A link to the parent issue that the note is a sub-task of, will be placed alongside the summary in the release notes. If note relates to additional changes, then add them as Relates links to the note and add the label RN-MultipleLinks - see JDK-8284975 as an example.
- Multiple release notes for the same change
- If more than one release note is required for the same set of fixes, then open additional sub-tasks with the same Affects Version - see JDK-8073861 as an example.
- Release notes across backports
- If an issue is backported to earlier releases the same note will be used - just add the new release version in the Affects Version field of the release note.
- Where a different release note is required, then create a separate note with the Affects Version for the new release - see JDK-8308194 and JDK-8322473 for an example.
RN-labels
Unless labeled otherwise it will be assumed that the release note documents a change in behavior (will have likely required a CSR) or other item which should be included in the release notes. If the note covers a more specific type of change, then one of the following labels can be included (notes of a similar type will be listed together).
- RN-NewFeature
- A new feature or enhancement in the release. The Summary must be the item/API or new functionality. The Description must contain the name of the new feature, its intended function, and how a user can utilize it. Example: JDK-8315443
- RN-IssueFixed
- A significant issue which has been fixed. This would normally be a regression or an issue which was unknowingly released in a new feature. The Summary must be a summary of the error that was fixed. The Description must contain a statement about what was fixed, how the fix effects the user, and any special conditions that a user should be aware of regarding the fix. Example: JDK-8184172
- RN-KnownIssue
- An issue that wasn’t possible to fix by the time the release was GA’d. The Summary must be a summary of the error that the user sees. The Description must contain details about the error, how it effects the user, and workarounds if any exist. Example: JDK-8191040
- RN-Removed
- Only for major releases. The release note covers an API, feature, tool etc. which has been removed from the JDK. The Summary must be of the form “Removal of” Item/API. The Description must contain the list or name of the removed items/API with (optional) the reason for its removal. Include any special conditions that a user should be aware of regarding the removal. Example: JDK-8185066
- RN-Deprecated
- Only for major releases. The release notes cover an API, feature, tool etc. that has been marked as deprecated in the release. The Summary must be of the form “Deprecated” Item/API. The Description must contain the name of the item that has been deprecated, the reason for its deprecation, and (optional) any special conditions that a user should be aware of regarding the possible future removal. Example: JDK-8296385
- RN-Important
- Used to indicate that the release note should be highlighted in some fashion, such as listing it at the beginning of the release notes.
- RN-(distro)
- Used to indicate that the release note is only relevant for a specific JDK distribution. E.g. RN-Oracle
- RN-MultipleLinks
- Used to indicate that the release note should refer to multiple changes - see Advanced options section.
RN-Change- Deprecated. This is the default and no label is needed to indicate this.
Querying the release notes
The Release Notes for a particular release can be found using the JBS query
affectedversion = <version> and type = sub-task and labels = release-notewhere <version> is the appropriate release
value, e.g. 17.
The JDK Release Process
Quick Links
The JDK Project has a well defined release process. JEP 3 describes this process in detail. This section intends to clarify some topics that often cause questions.
Release cycle
The release cycle starts when development of a new release begins, and ends when that release is delivered to the public. The current release cadence is six months. This means that every six months we start development of a new release, and every six months a new release is delivered. However, this doesn’t mean that each release cycle is six months. As described below, the total development time for a release (the release cycle) is actually nine months. Obviously this in turn doesn’t mean that all features are developed in nine months. Most features are developed for a much longer time than that, and goes through long time development in other Project repositories, and through a series of preview and experimental stages. But any feature that is to be included in a specific release has a specific window of nine months to integrate the code into mainline and fix all the remaining bugs.
It may be tempting to integrate a new feature near the end of a release cycle, to get more time to fix all those last bugs before integration. Please don’t. If you are getting close to the end of a release and you still just have one more bug to fix, please defer your feature to the next release. It’s only six months out. Not only will this vouch for your new feature to be more stable on release, you will also help keeping the JDK as a whole more stable by allowing others to find and fix bugs in their new code that might come as a result of your changes.
Integrating early in a release is preferable, but all new features can’t be integrated at the same time. If many large changes enters the repository at the same time it will be more difficult to determine which change that caused all the new bugs. If you’re about to integrate a larger change you must therefore communicate this on the relevant mailing lists to synchronize with other Projects that may also be planning to integrate something soon.
Milestones and phases
Throughout the release there are a number of milestones and phases that define where in the release cycle we are.
- The start of a release
- Since development is always ongoing in the master branch of the mainline repository (openjdk/jdk), the start of a new release can be said to be when the former release is branched for stabilization. After the start of the release follows six months of development to implement and integrate all the cool stuff that will go into the next release. After these six months ramp down begins.
- Ramp Down Phase 1 (RDP1)
- The ramp down of a release starts with a new branch being created (the stabilization branch) from the master branch in the mainline repository. During the ramp down of a release we focus on bug fixing and stabilization in order to get the JDK ready for release. In RDP1 you may continue to fix P1-P3 product bugs (and some other issues) in the stabilization branch. For detailed information on what can be fixed when, see Push or defer during ramp down below. The start of RDP1 is essentially the deadline for integrating JEPs and enhancements into a particular release.
- All Tests Run (ATR)
- ATR is not a milestone described in JEP 3, but it’s still a concept that might be mentioned in discussions on this topic and is therefore good to know about. ATR (a.k.a. ATR Start) is the start of an approximately six week long test period where all tests in the test plan for the given release is ran. ATR usually starts at the same time as RDP1.
- Ramp Down Phase 2 (RDP2)
- In RDP2 the bar is higher to get changes into the release. For product bugs, only P1:s and P2:s are supposed to be fixed here, and to do so an approval is needed. See the Fix-Request Process for details on how to obtain one. All other product bugs should be deferred. See Push or defer during ramp down below for more details. Also note that there is no guarantee that localization can be done for changes made in RDP2.
- Release Candidate (RC)
- Towards the end of the release cycle, when there are no more open product bugs targeted to the release, a stable build is selected to be the release candidate. This build will go through additional testing and if no more issues are found it will be the build released. If new bugs are found these are investigated and hopefully fixed, and a new build becomes the release candidate. The RC phase has a few milestones with a deadline for finding a candidate build, and another for making sure the build is ready to go live.
- General Availability (GA)
- This is the end of the release cycle. The last release candidate build is made available to the public.
Push or defer during ramp down
JEP 3 contains the exact definitions for what can be done when. This is a visualization of those definitions that may or may not clarify things.
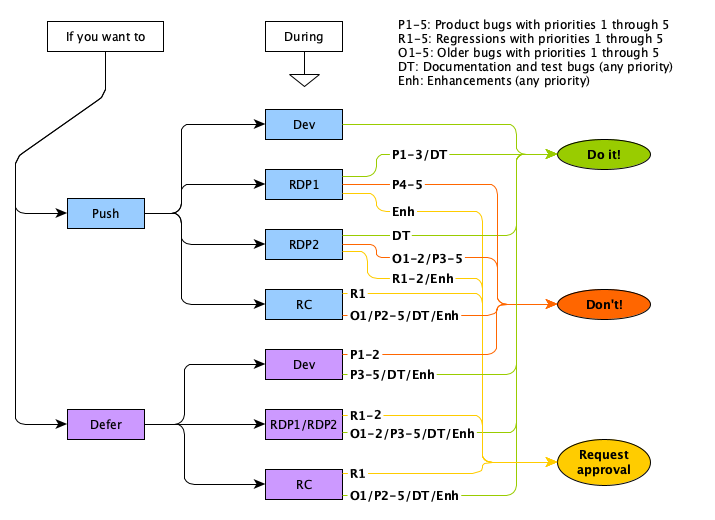
Push and defer guidelines during ramp down
Deferring P1 and P2 bugs
Even though there’s nothing explicitly written in the process about deferring P1 and P2 bugs during the initial development phase, the assumption is that these aren’t deferred unless time runs out at the end of the release cycle.
Please note that the priority of a bug doesn’t change just because you want to get your fix in late in the release, or if you want to be able to defer it. The priority is based on the severity of the bug and if it was deemed to be a P2 before, you better have a really good explanation to why that conveniently has changed by the end of the release. Being hard to fix is not a reason to lower the priority of a bug.
Project Maintenance
Many OpenJDK Projects build on top of the JDK source code for instance to produce new language features, like Projects Amber and Valhalla. When doing this there are a number of common workflows that are dealt with by most Project maintainers. For instance, updating the codebase (merging) to bring in the latest changes from the upstream JDK Project.
Merging JDK mainline into a Project repository
Merging changes from one git repository to another is basically the same thing as getting your own changes merged into the Project repository, with the slight twist that you don’t write all the changes yourself, you just pull them from somewhere else.
In this example we’ll use a separate clone of the Project repository to perform the merge in. This can be done using branches as well, but let’s keep it simple for now.
Init - done once
First set up your personal fork of the Project repository, in
this example called my-project. If you already are a
Contributor to
the Project you
most likely have this set up. If not, see Cloning the JDK for details on how to do
that.
git clone git@github.com:OpenDuke/my-project.git project-merge
cd project-merge
git remote add upstream git@github.com:openjdk/my-project.git
git remote add mainline git@github.com:openjdk/jdk.git
We clone the personal fork (in this case we clone
OpenDuke’s personal fork) into a local directory, here called
project-merge. We then set up two remotes,
upstream and mainline.
Performing the merge
The clone we set up above is used each time you want to bring changes from mainline in to your Project. This is done by first pulling the changes from mainline and then pushing to your personal fork. A regular PR will then be created which you can integrate into your main Project repository. It sounds easy, and it is, but there are a few details below to keep in mind.
cd project-merge
git pull upstream master
git push
git switch -c Merge_mainline
git fetch mainline
We start by updating the local fork with the latest changes from
the main Project repository. Note that we then create a new branch
“Merge_mainline” in which the merge will
happen. Finally we fetch all new changes from mainline.
Merging from what ever is latest isn’t usually a good idea, mainline code is not “clean” for any given commit. Merging JDK tags ensures you have a known quality, those tagged commits are known to compile and pass tests. Therefore, next we check which tags have not been merged yet.
git tag -l "jdk-*" --no-mergedOr if you just want to see the latest tag you haven’t merged,
git tag -l "jdk-*" --no-merged | tail --lines 1Before merging, you may want to check what’s incoming, to get an idea of the size of the merge and look for any incoming changes that you suspect may cause issues.
git log --topo-order --pretty=oneline --reverse ..$TAGAnd finally we initiate the actual merge.
git merge $TAGThe commands above will likely run without a hitch up until the
final git merge. This is where you need to combine the
changes that were made in mainline with the changes that have been
made in your Project repository. If there are no conflicts
you’re in luck, then the merge will be completely automated
and you will end up with a committed merge. If there are conflicts
however you’ll need to manually go through the files where
the conflicts are and make sure you select the correct version for
each change. Using git status you can see what files
that need to be merged. Depending on how much code your Project has touched, this
can be quite a bit of work.
For complicated merges, see Sharing the work below.
Test before integration
Regardless of if you encountered conflicts or not, you should
always build and test your merge before integrating it to your
Project repository. Testing needs to be done even when there are no
textual conflicts as changes like for instance a rename can result
in a compile or test error without any conflict. One could argue
that git merge --no-commit could be used and have
logical errors fixed in the merge commit. However, a subsequent
“Fix logical merge errors” commit, is in fact more
useful, as it clearly shows the Project specific adjustments needed
for incoming changes.
It’s always okay to have further commits to clean up after a merge. Hiding a large amount of reworking Project code to fit with upstream changes in a single merge commit will make it hard for further errors post integration to be identified.
The commit, push, and PR
Once you have a working version of your merged code you’re
ready to create the merge commit and push. Please note that
git commit is only needed if there were conflicts. If
the changes were successfully merged by git merge, you
already have a committed merge.
git commit -m "Merge"
git push --set-upstream origin Merge_mainline
Now it’s time to create the PR on GitHub. Just opening the PR page in your browser will most often be enough to see a message about new code that was pushed to your personal fork. Click the button to create the PR.
Make sure the PR title starts with “Merge”. You may have noticed that when you integrate a “normal” PR into an OpenJDK repository, all commits that have been done in that PR will be squashed into a single commit. For normal changes this is a good thing as each PR normally corresponds to a single JBS issue, but for a merge it would be highly undesirable to squash all the different commits that you pull in from mainline. A PR with a title that starts with “Merge” won’t be squashed. That means that all the changes that you brought over will remain separate changes.
It’s always a good idea to also include what was merged in the title of the PR. If you for instance is pulling in JDK mainline into your Project repository it’s likely (because it’s in general a good idea) that you choose some stable EA tag in mainline to merge. Your PR title could then be something like “Merge jdk-21+2”.
Whether a merge requires a review or not is up to your Project lead to decide. Many Projects don’t require this so the GitHub bots will allow you to integrate the merge as soon as the GHAs are done. (They actually allow you to integrate even before the GHAs are done, but that’s in general not a good idea.)
Once the PR has been integrated, you can clean up your fork and its clone in preparation for the next merge.
git switch master
git branch -d Merge_mainline
git push -d origin Merge_mainline
These commands will remove the temporary branch that we created
to perform the merge. There’s a button in the GitHub GUI to
delete the branch after you have integrated the PR. This can be
used instead of the last of the three commands above (git
push -d...).
Sharing the work
When conflicts take place in areas requiring specialized knowledge you may need help from other Contributors. Backing up the original conflicts will help if you find yourself “in too deep”, and need assistance from other Contributors. You can add and later remove these backups, along with a readme describing the merge status, to the actual merge branch to aid communication (i.e. you may not be able to compile certain components).
Something like the following shell one-liner can be used to perform the backup.
git status | grep "both modified:" | while read B M FILE; do cp -v $FILE $DEST ; doneBelow are two different methods of collaborating on a merge described. Please note that extra commits are fine. The merge PR itself will describe any special actions that were taken in case further failures turn up after merge integration. Ultimately these commits will be squashed when integrating the project back into mainline.
1. Parking a merge with conflicts in place
“Park” the conflicts, unresolved, in a personal
fork, and let others do the further work (by sending you a patch,
or opening your personal fork up to push from other Contributors). Do this
by keeping a list of unresolved conflicts (perhaps checking in said
list to describe the merge state), and then marking them as
resolved in git, committing, and pushing them to your personal
fork. E.g. git add $UNRESOLVED_FILES; git commit; git
push
Pros: All unresolved conflicts are stated and can be worked on by multiple parties, all at once.
Cons: Broken branch in terms of compile and test, may require temporary workaround patches to be passed around to complete work on specific unresolved components.
2. Incremental merging
An alternative to parking a merge with conflicts in place, is to incrementally merge up to the troublesome point. For example:
- Perform the initial merge:
git merge $TAG - Find yourself in trouble, identify which change is causing the issue.
- Abort:
git merge --abort - Find the troublesome change:
git log --topo-order --pretty=oneline --reverse $(current_branch)..$TAG - Merge up to the previous change, commit and integrate.
- Ask others to continue the merge from the troubled change forward, how far forward is up you of course, either just that troublesome change, or the rest of the merge up to the $TAG.
- Rinse and repeat: There may appear further conflicts requiring other Contributors’ help.
Pros: All commits in the merge branch compile and test, you always have a working branch.
Cons: There is an unknown extra amount of merge work, multiple iterations create more work. For instance you may find yourself resolving the same files multiple times (e.g. back-out commits).
HotSpot Development
See Working With Pull Requests for generic guidance and requirements around integrating changes. For the HotSpot codebase there are a few additional requirements:
- Your change must have been approved by two reviewers out of which at least one is also a Reviewer
- Your change must have passed through HotSpot tier 1 testing
with zero failures (See tier1 definition in
test/hotspot/jtreg/TEST.groups.)
Logging
Quick Links
While developing your fix, you might want your code to output some diagnostic information. You might even want to leave some logging in the code you check in, to facilitate future diagnostics. The appropriate way to print logging output from HotSpot is through the Unified Logging Framework (JEP 158). It gives you a lot of nice features and enables common command-line options for all logging.
A basic log message can be output like this:
log_info(gc, marking)("Mark Stack Usage: " SIZE_FORMAT "M", _mark_stack_usage / M);Where ‘gc’ and ‘marking’ are tags, and
‘info’ is the log level. Tags associate log messages
with certain subsystems or features and the log level determines
the importance and verbosity of the message. The most verbose
output is trace, and the least is error. The full list of tags and
levels are available via -Xlog:help.
The basic log API looks as follows:
log_<level>(Tag1[,...])(fmtstr, ...)Sometimes single line printf-style logging isn’t enough.
For example, it can be useful to group several log lines together
or to use HotSpot’s outputstream API. UL supports both of
these use cases using LogMessage and
LogStream, respectively.
LogMessage(gc, marking) lm;
if (lm.is_info()) {
  lm.info("We are guaranteed to be");
  lm.info(" grouped together");
}
LogMessage will submit its output when it goes out
of scope.
LogStream is typically used when a single
printf-style format string becomes unwieldy.
LogStream st(Log(gc, marking)::info());
if (st.is_enabled()) {
  // Print without newline
  st.print("I'm printing a lot of %s ", "arguments");
  st.print("With a lot of extra info %d ", 3);
  // Print with newline (cr stands for carriage return)
  st.print_cr("and so it's useful to use a stream");
}
If you need to print multiple lines grouped together with
complex formatting requirements then
NonInterleavingLogStream is probably what you
want.
LogMessage(gc) lm;
NonInterleavingLogStream st{LogLevelType::Info, lm};
if (st.is_enabled()) {
  st.print_cr("Line one: %d %d %d ", 1, 2, 3);
  st.print("Line two: %d %d %d", 4, 5, 6);
  st.print_cr(" still line two: %d %d %d", 7, 8, 9);
}
Enabling logging
You enable logging in the JVM by using the -Xlog
command line option specified. For example, the messages from the
examples would be visible if the JVM were run with any of the
following options:
-Xlog:gc+marking=info
-Xlog:gc+marking
-Xlog:gc*
You can have multiple -Xlog options, these are
applied in an additive manner. Consider this example:
-Xlog:gc+marking=info:stdout -Xlog:alloc=warning:stderr -Xlog:breakpoint=error:breakpoint.txt:levelThis specifies that:
- Log messages with info level and up, with tags gc and marking, to stdout.
- Log messages with warning level and up, with tag alloc, to stderr.
- Log messages with error level and up, with tag breakpoint, to file breakpoint.txt, with the decorator level.
UL automatically applies a default argument of
-Xlog:all=warning:stdout:uptime,level,tags when
logging is enabled. This can be disabled by prepending
-Xlog:disable to your arguments.
-Xlog:disable -Xlog:gc+marking=info -Xlog:alloc=warningStarting the JVM with the option -Xlog:help outputs
more information and more examples.
A full description of the syntax of -Xlog is
available in JEP
158.
Code Owners
This list is intended to make it easier to identify which email list to include in code reviews when making changes in different areas. The list may also help when assigning bugs based on which code they are found in. Please note that some directories may have been created or removed between releases. The intention here is to include directories that exists in mainline, LTS releases and other releases (post JDK 9) commonly being updated.
Area mailing lists
- Generic JDK Development:
jdk-dev - Build:
build-dev - Client Libs:
client-libs-dev - Core Libs:
core-libs-dev - HotSpot:
hotspot-dev- Compiler:
hotspot-compiler-dev - GC:
hotspot-gc-dev - Runtime:
hotspot-runtime-dev - JFR:
hotspot-jfr-dev - Serviceability:
serviceability-dev
- Compiler:
- Java Language (javac):
compiler-dev - Security:
security-dev - Tools
- Javadoc:
javadoc-dev - JShell:
kulla-dev - Nashorn:
nashorn-dev
- Javadoc:
Directory to area mapping
- .jcheck - Build
- bin - Build
- demo - Client Libs
- doc
- hotspot
- cpu - Compiler, Runtime
- os - Runtime
- os_cpu - Compiler
- share
- adlc - Compiler
- asm - Runtime
- c1 - Compiler
- cds - Runtime
- ci - Compiler
- classfile - Runtime
- code - Compiler
- compiler - Compiler
- gc - GC
- include - HotSpot
- interpreter - Runtime
- jfr - JFR
- jvmci - Compiler
- libadt - Compiler
- logging - Runtime
- memory - GC, Runtime
- metaprogramming - HotSpot
- nmt - Runtime
- oops - GC, Runtime
- opto - Compiler
- precompiled - HotSpot
- prims - Runtime, Serviceability
- runtime - Runtime
- sanitizers - Runtime
- services - Runtime
- utilities - GC, Runtime
- java.base
- Core Libs should almost always be included but Java Language, HotSpot, Security and/or I18n may also be involved.
- [aix,
linux,
macosx,
share,
unix,
windows]/classes
- com/sun/crypto - Security
- com/sun/security - Security
- crypto - Security
- [aix,
linux,
macosx,
share,
unix,
windows]/internal
- access - Core Libs, Security
- classfile - Core Libs
- constant - Core Libs
- event - JFR
- foreign - Core Libs
- icu - Core Libs
- invoke - Core Libs
- io - Core Libs
- javac - Java Language (javac)
- jimage - Core Libs
- jmod - Core Libs
- jrtfs - Core Libs
- [aix, macosx, share, unix, windows]/loader - Core Libs
- logger - Core Libs
- math - Core Libs
- [share, unix, windows]/misc - Core Libs, HotSpot
- module - Core Libs
- org/objectweb - Core Libs
- org/xml - Core Libs
- perf - Runtime
- [linux, share, unix, windows]/platform - HotSpot
- random - Core Libs
- ref - Core Libs, GC
- reflect - Core Libs
- util/random - Core Libs
- util/regex - Core Libs
- util/xml - Core Libs
- vm - HotSpot
- invoke - Core Libs
- [share, sun, unix]/io - Core Libs
- [macosx, share, unix, windows]/java
- launcher - Tools, Core Libs
- META-INF/services - Core Libs
- [javax, macosx]/net - Net
- [aix, java, linux, macosx, unix, windows]/nio - NIO
- reflect - Core Libs
- [apple, java, javax, macosx, unix, windows]/security - Security
- [java, sun]/text - I18n
- [java, macosx, windows]/util - I18n, Core Libs
- [aix, share, unix, windows]/conf
- [share, windows]/legal
-
man
- java.md - Tools, HotSpot
- keytool.md - Security
- [aix,
linux,
macosx,
share,
unix,
windows]/native
- common
- [share, unix, windows]/include - Runtime, Core Libs
- jspawnhelper - Tools
- [share, unix, windows]/launcher - Tools
- libfallbackLinker - Core Libs
- [aix, linux, macosx, share, unix, windows]/libjava - Core Libs
- [share, unix, windows]/libjimage - Core Libs
- [aix, macosx, share, unix, windows]/libjli - Tools, Core Libs
- libjsig - HotSpot
- [macosx, share, unix, windows]/libnet - Net
- [aix, linux, macosx, share, unix, windows]/libnio - NIO
- libosxsecurity - Security
- libsimdsort - Core Libs
- [aix, share, windows]/libsyslookup - Core Libs
- libverify - Runtime
- libzip - Core Libs
-
share/data
- blockedcertsconverter - Security
- cacerts - Security
- currency - I18n
- lsrdata - I18n
- publicsuffixlist - Client Libs
- tzdata - I18n
- unicodedata - I18n
- java.compiler - Java Language (javac)
- java.datatransfer - Client Libs
- java.desktop - Client Libs
- java.instrument - Serviceability
- java.logging - Core Libs
- java.management - Serviceability
- java.management.rmi - Serviceability
- java.naming - Core Libs
- java.net.http - Net
- java.prefs - Core Libs
- java.rmi - Core Libs
- java.scripting - Tools
- java.se - Core Libs
- java.security.jgss - Security
- java.security.sasl - Security
- java.smartcardio - Security
- java.sql - Core Libs
- java.sql.rowset - Core Libs
- java.transaction.xa - Core Libs
- java.xml - Core Libs
- java.xml.crypto - Security
- jdk.accessibility - Client Libs
- jdk.attach - Serviceability
- jdk.charsets - I18n, Core Libs
- jdk.compiler - Java Language (javac)
- jdk.crypto.cryptoki - Security
- jdk.crypto.ec - Security
- jdk.crypto.mscapi - Security
- jdk.dynalink - Tools
- jdk.editpad - JShell
- jdk.graal.compiler - Compiler
- jdk.graal.compiler.management - Compiler
- jdk.hotspot.agent - Serviceability
- jdk.httpserver - Net
- jdk.incubator.vector - Compiler
- jdk.internal.ed - JShell
- jdk.internal.jvmstat - Serviceability
- jdk.internal.le - JShell
- jdk.internal.md - Tools
- jdk.internal.opt - Tools
- jdk.internal.vm.ci - Compiler
- jdk.jartool - Tools
- jdk.javadoc - Javadoc
- jdk.jcmd - Serviceability
- jdk.jconsole - Serviceability
- jdk.jdeps - Core Libs
- jdk.jdi - Serviceability
- jdk.jdwp.agent - Serviceability
- jdk.jfr - JFR
- jdk.jlink - Tools
- jdk.jpackage - Core Libs
- jdk.jshell - JShell
- jdk.jsobject - Tools
- jdk.jstatd - Serviceability
- jdk.localedata - I18n
- jdk.management - Serviceability
- jdk.management.agent - Serviceability
- jdk.management.jfr - Runtime
- jdk.naming.dns - Core Libs
- jdk.naming.rmi - Core Libs
- jdk.net - Net
- jdk.nio.mapmode - NIO
- jdk.sctp - Net
- jdk.security.auth - Security
- jdk.security.jgss - Security
- jdk.unsupported - Core Libs
- jdk.unsupported.desktop - Client Libs
- jdk.xml.dom - Core Libs
- jdk.zipfs - Core Libs
- make - Build
- test
- The test directories follow to a large part the same structure
as the source code in
src. The owners are the same for directories with the same names.
- The test directories follow to a large part the same structure
as the source code in
- utils
Directories removed
- hotspot
- java.base
jdk.aot– Compiler (Removed in 17)jdk.crypto.ucrypto– Security (Removed in 12)- only available on Solaris
jdk.incubator.concurrent– Core Libs (Removed in 21)jdk.internal.vm.compiler– Compiler (Removed in 22)jdk.internal.vm.compiler.management– Compiler (Removed in 22)jdk.pack– Tools (Removed in 14)jdk.random– Core Libs (Removed in 23)jdk.rmic– Core Libs (Removed in 15)jdk.scripting.nashorn– Tools (Removed in 15)jdk.scripting.nashorn.shell– Tools (Removed in 15)
About This Guide
This guide is being maintained through the OpenJDK Developers’ Guide Project. The source repository is available at GitHub. The revision hash at the bottom of this page refers to the last published commit.
Comments and questions may be sent to guide-dev@openjdk.org. Please let us know if there’s anything in the guide that isn’t clear.